Showing posts with label Fruit. Show all posts
Wednesday, August 10, 2011
Blueberry Lemon Buttermilk Cakes
Remember how I said that buttermilk cake was an easy and great base for any number of variations? Well, here's one of them!
To the basic recipe I added 1 tbsp lemon zest. I placed fresh, seasonal blueberries in the bottom of a regular-sized muffin tin and spooned the batter on top. After baking them for about 10 minutes I inverted them onto a plate and voila! A dozen individual cakelettes, perfect for entertaining!
Enjoy!
Tuesday, August 2, 2011
Jewels of Summer
Stop everything you're doing. Just drop it. Get up and go to a farmers' market. Buy heirloom tomatoes. Bring them home. Slice them gently with a sharp knife. Arrange them on a plate. Sprinkle them with freshly ground pepper and sea salt. Drizzle them with the best olive oil you have. Eat them.
You're welcome.
Labels:
Fruit,
Salads,
Vegetables
Friday, July 15, 2011
Grilled Peaches!
Grilled peaches are so simple and so delicious you might almost give up eating them plain. What I especially love about them is that they strike a perfect balance between fresh and cooked. The slight bit of char adds a lovely flavor and the warmth makes them even juicer, but they aren't cooked so much that they lose their vibrancy.
Preparation is as simple as it gets. Cut a peach in half and remove the pit. I don't bother taking the skin off as I kind of like it. Rub the peach halves all over with a little bit of extra virgin olive oil. Heat up a grill, grill pan, or cast iron skillet. Place the peaches in the pan and cook about two minutes each side.
Serve them warm. They are delicious with yogurt for breakfast, (as shown), and they'd also be great for dessert... perhaps with a little vanilla bean ice cream and fresh chopped mint?
Labels:
Fruit
Saturday, July 2, 2011
Strawberry Basil Popsicles
Nothing is quite so disappointing as bringing home a beautiful pint of strawberries, taking a bite, and finding them just a bit too sour. While jams or pies are certainly good options for these unfortunate berries, they don't exactly showcase the freshness of the fruit. Using them for popsicles, on the other hand, allows you to sweeten them up and keep them bright, cool, and refreshing.
Ingredients:
- 1 pint strawberries
- 8 fresh basil leaves
- 1/2 c. sugar
- 1 c. water
Directions:
- Combine the sugar and water in a small pot and simmer until the sugar is dissolved.
- Hull the strawberries and combine them with basil leaves and simple syrup in a blender.
- Blend until liquified.
- Pour the mixture into popsicle moulds. You can strain it if you want, but I like the slight texture of the little bits of pulp, leaves, and seeds.
- Freeze until solid.
Oh, and pardon the dirty fingernails. I'd just come in from the garden: the best time to have a popsicle, indeed.
Enjoy!
Labels:
Dessert,
Fruit,
Quick and Simple
Thursday, June 9, 2011
Rhubarb Tarts with Aprium Glaze
I didn't grow up eating rhubarb but I have just fallen in love with it over the past few years: this bright, tart vegetable- yes, vegetable- that we seduce into a dessert through sheer willpower (and lots of sugar) to fulfill or winter-long craving for fruity tartness. These tarts showcase the rhubarb and puff pastry equally, a combination that can do no wrong.
The tarts also feature an aprium glaze. Aprium? Yes, these are a hybrid between apricots and plums (a 3:1 ratio, to be specific). I was very excited when I saw these at the grocery store and immediately imagined a concoction with fresh fruit and pastry cream. However, I found their texture to be a little lacking so I decided instead to use them for glazes and sauces. They added just the right amount of floral sweetness to these rhubarb tarts. If no apriums are to be found, an apricot would be just fine.
Ingredients:
- 1 aprium
- 1 tsp lemon zest
- 1 tbsp lemon juice
- 1/4 c. + 2 tbsp water
- 1/4 c. + 2 tbsp light brown sugar
- 2 c. sliced rhubarb
- 1 approximately 10x16 sheet of puff pastry, thawed if store bought.
Directions:
- Begin by slicing up the aprium and mashing it through a sieve into a bowl. No need to peel it first: the sieve will take care of that.
- To the fruit puree and juices add the lemon zest, lemon juice, 1/4 c. water, and 1/4 c. brown sugar. Whisk until combined.
- Slice the rhubarb at and angle to create longer slices. Add the rhubarb to the bowl and toss to coat with the liquid. Let marinate for 30 minutes.
- Prepare your puff pastry by cutting it into the desired shape and size, (I made four, but eight would be cute and perhaps ideal for individual servings).
- With a sharp knife, cut lines to mark the edges: this will help the puff pastry rise at the border. Don't cut completely through the dough, just about half way.
- Arrange the rhubarb, without the juices, in the center of each piece of dough. Make it look pretty!
- Bake the tarts at 400 degrees for 20-30 minutes, until the the crust is golden.
- While the tarts bake, transfer the remaining juices into a small pot and add 2 tbsp. water and 2 tbsp sugar.
- Simmer the mixture on low heat, whisking occasionally, for about 5 minutes until it has thickened and is a bit syrupy.
- When the tarts come out of the over brush them all over ,(crust included), with the aprium glaze. Let the tarts cool for at least additional minutes before serving.
Serve the tarts warm or at room temperature. They are delicious on their own, but are also nice with a bi of vanilla bean ice cream. Like most puff pastry desserts, they are best eaten the first day. However, with a brief stop in the oven to crisp them up again, they are are still tasty the next day.
Sunday, May 15, 2011
A Rather Unusual Pizza
When I saw this challenge for savory strawberry dishes, my mind went to work. Of course, the usual culprit is a strawberry salad with balsamic vinaigrette. I jumped from that idea and transformed it to a pizza with kale 'pesto', balsamic caramelized onions, strawberries, smoky bacon, and goat cheese.
To make the pesto, tear 3 stems of kale into bite-sized pieces. Put in a food processor with about 4 tbsp olive oil, two garlic cloves, salt, and pepper and blend until smooth-ish. Add additional olive oil if necessary.
Slice the onions and sautee them in a pan with a drizzle of olive oil until tender and golden. Add a splash of balsamic and toss until the liquid is gone.
Spread the pesto on the pizza dough, then add the onions. Chop 1 slice of bacon into a 1/4” dice. Be sure to use a good quality, thick cut bacon that has lots of meat and flavor. Bacon that is excessively fatty will lead to a greasy pizza. Add the bacon, then the thinly sliced strawberries, then top with goat cheese crumbles (about 3 oz.) Put in a 475 degree oven for 15-20 minutes, until the crust is golden and the cheese is lightly browned.
This pizza was pretty tasty: the strawberries aren't unlike topping it with very sweet tomatoes. I can't say it was my all-time favorite topping, nor would I use prized farmers' market strawberries for this purpose, but if you're feeling experimental, give it a try! As for savory strawberries, I may explore some more. When the weather warms up a bit I think I'll give it another go with strawberry jalapeno salsa.
Enjoy!
Enjoy!
Labels:
Fruit,
Pizza,
Vegetables
Friday, May 6, 2011
Strawberry Frangipane Tart
It's hard to imagine the possibility of summer approaching until strawberries start to make their appearance. What a cheerful, bright harbinger they are! While I normally revel in enjoying them fresh and plain, baking with strawberries can be a real delight, especially for those first few begin to appear at the market in spring. They are a natural pairing with frangipane-- that delicious, fluffy almond creme-- but I decided to mix things up a bit. Instead of the traditional almonds, I used pecans in the frangipane. I also blended the strawberries right in, rather that layering them on top. The result is a pretty magenta tart with a delicate jammy flavor that will guarantee a smile.
Ingredients for the Tart Shell:
- 6 tbsp butter, cut into pieces
- 1 tbsp canola oil
- 3 tbsp water
- 1 tbsp sugar
- 1 pinch salt
- 1 cup flour
Directions:
- Combine all ingredients except the flour into an oven safe bowl.
- Put in a 400 degree oven for 15 minutes.
- Carefully remove the bowl, add the flour, and stir with a wooden spoon until a dough is formed.
- Let the dough cool until it is safe enough to handle.
- Transfer the dough to your tart pan and gently press it out and up the sides. Reserve a small piece of dough to patch any cracks after blind baking.
- Prick all over with a fork, especially the corners.
- Return the tart shell to the oven for 15 minutes until it is lightly golden.
- Upon removal patch any noticeable cracks with the reserved dough. If you work quickly and have little feeling in your fingertips, you can add it instantly and it will cook right on.
- Let the tart shell cool.
Ingredients for Frangipane:
- 2/3 c. pecans, + additional for decoration
- 2/3 c. strawberries
- 1 egg
- 1/4 c. sugar
- 2 tbsp. butter, softened
- 1 tbsp. flour
- 1/2 tsp vanilla
Directions:
- Lightly toast the pecans and grind in a food processor until they are roughly sandy.
- Trim and chop your strawberries and add to the food processor along with all of the other ingredients.
- Pulse until smooth.
- Gently pour the frangipane into the tart mold.
- Place pecan halves in decorative manner of your choosing. You could cover the entire surface if you wanted a richer, nuttier tart.
- Bake in a 375 degree oven for 30 minutes, until the tart is firm.
- Allow to cool completely. I recommend serving with a generous scoop of fresh sliced strawberries. The tart should keep for up to three days, though it is best the first day as the color will fade a bit.
Enjoy!
Friday, April 22, 2011
Mango Yogurt Smoothie
I picked up some delicious mangoes on sale recently. These were 'Champagne' mangoes, different from the variety I normally get. They were slightly smaller, very sweet, juicy, and not stringy at all.
While I usually prefer to eat my fruit whole, I couldn't resist turning one of these into a smoothie, reminiscent of lassi. To add a little interest beyond the clean fruitiness, I added a dash a cinnamon. This provided a richer, more rounded flavor that was unusual and very nice.
- Cut up one mango to get about 1 cup of fruit chunks
- In a blender combine the mango, 1/2 cup plain yogurt, 1 tsp honey, 1 dash cinnamon, and a pinch of salt.
- Blend until smooth.
- Add 1/2 cup ice. Depending on your blender you may want to crush it a bit first. Blend until the ice is crushed.
I garnished mine with a little basil leaf... and next time I'm going to try a mango basil smoothie.
Enjoy!
Labels:
Dairy,
Fruit,
Quick and Simple,
Vegetarian
Thursday, April 14, 2011
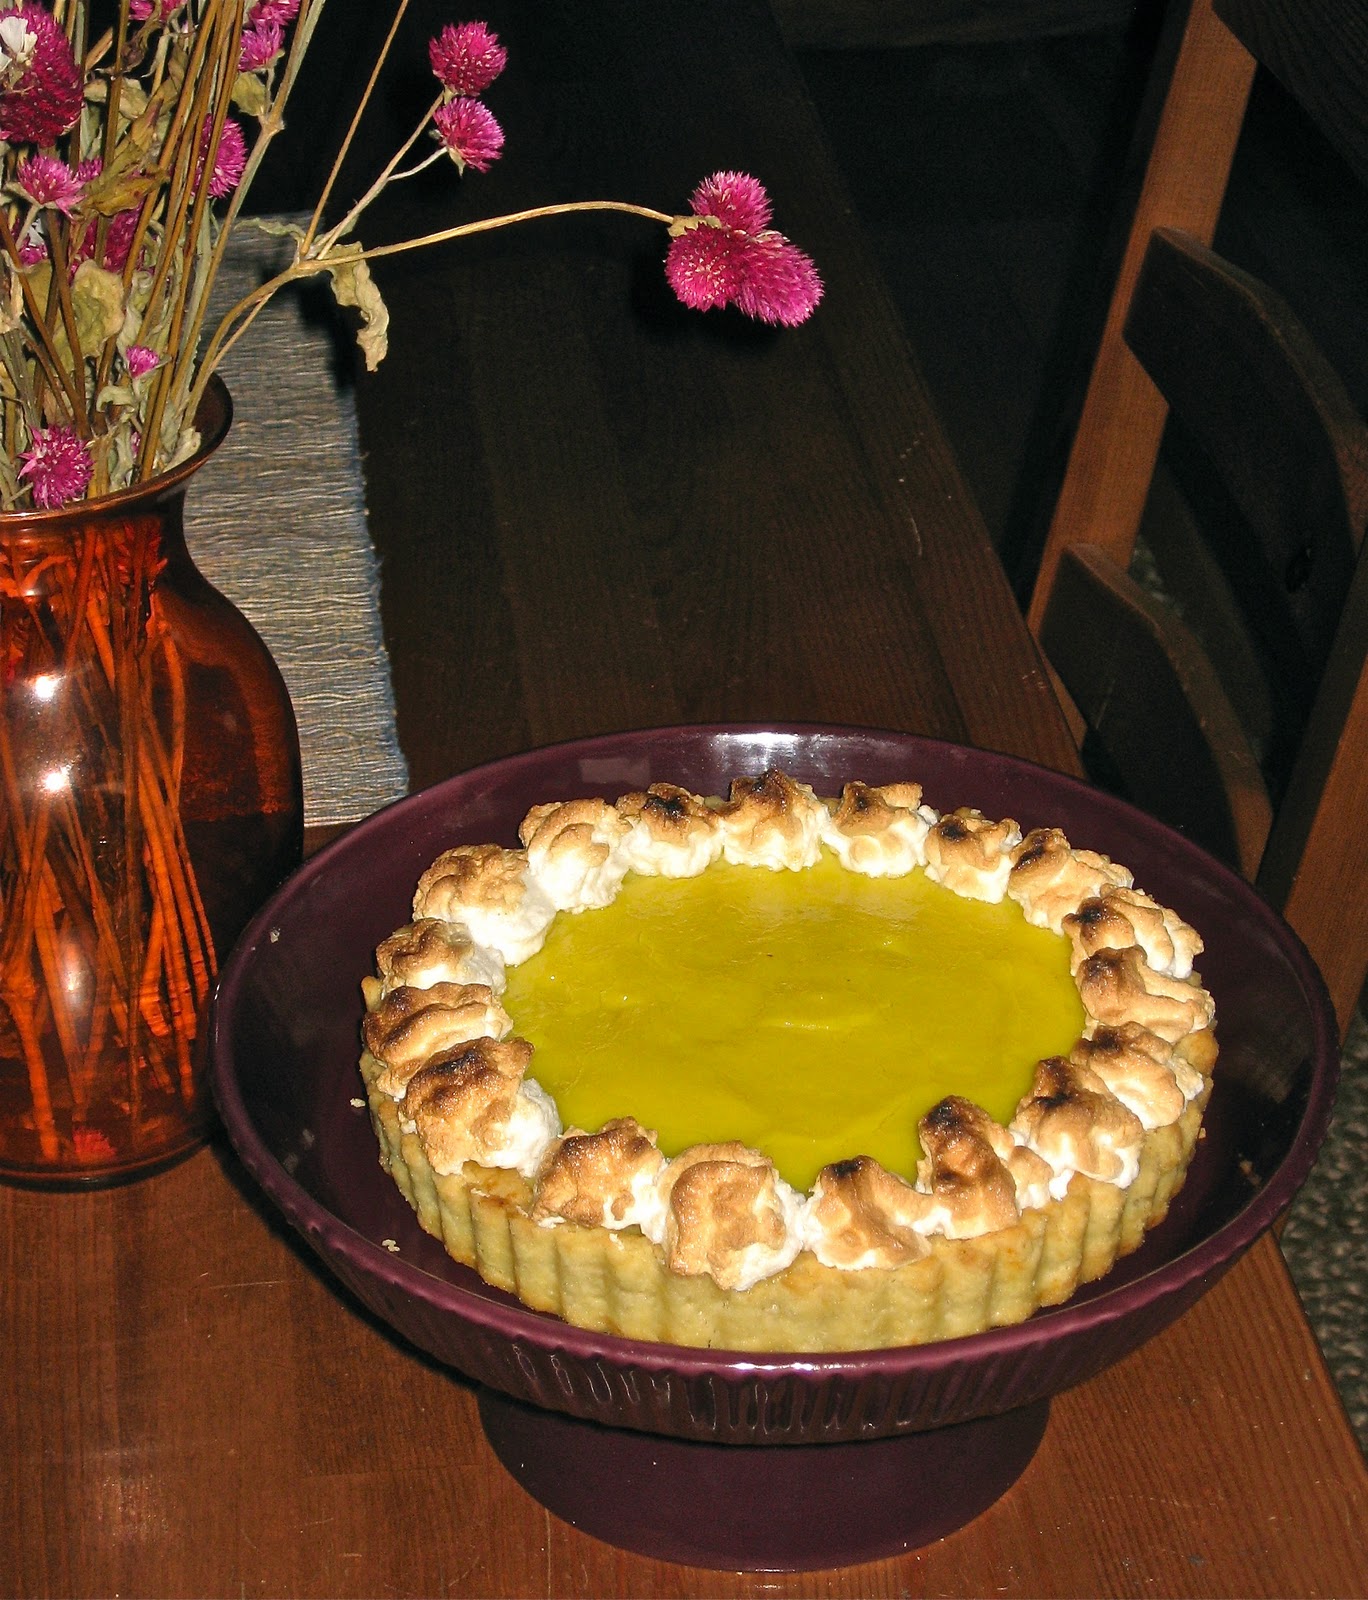
Smoky Lemon Tart
I have long wanted to make a lemon tart and have consistently put it off. Why? Because once I made one, I knew it wouldn't be long before I made another, and another... and that would get to be a problem.
Well, I had a few Meyer lemons hanging about that were just pleading to be made into a tart. How could I refuse? Then... inspiration. What if I roasted these lemons? A tart was born. And it was good.
Roasting the lemons creates a lovely round flavor. There's a hint of smokiness, but not enough to give the secret away. Most people would never guess what you were up to in the kitchen. I will advise that some may find it a little odd. If you took a bit expecting the usual lemon curd, you might notice a difference and find it slightly off putting. I do encourage you to take a chance on it, though. I found the risk most definitely worth it.
Before we get to the new and exciting stuff, we must make the crust. I used my favorite tart dough recipe, yet again.
Ingredients for the Tart Shell:
- 6 tbsp butter, but into pieces
- 1 tbsp canola oil
- 3 tbsp water
- 1 tbsp sugar
- 1 pinch salt
- 1 cup flour
Directions:
- Combine all ingredients except the flour into an oven safe bowl.
- Put in a 400 degree oven for 15 minutes.
- Carefully remove the bowl, add the flour, and stir with a wooden spoon until a dough is formed.
- Let the dough cool until it is safe enough to handle.
- Transfer the dough to your tart pan and gently press it out and up the sides. Reserve a small piece of dough to patch any cracks after blind baking.
- Prick all over with a fork, especially the corners.
- Return the tart shell to the oven for 15 minutes until it is lightly golden.
- Upon removal patch any noticeable cracks with the reserved dough. If you work quickly and have little feeling in your fingertips, you can add it instantly and it will cook right on.
- Let the tart shell cool.
Now, on to the fun part!
As with roasting a marshmallow, a bit of char is desired.
Ingredients for the Lemon Curd:
- 1/2 c. lemon juice (about four small), preferable Meyer lemons: their flavor is lovely, if less tart. Regular lemons may be used, but the sugar should be increased a bit.
- 1/3 c. sugar
- 2 eggs
- 2 egg yolks (set the whites aside for the meringue below)
- a pinch of salt
- 6 tbsp butter, cut into 1/2" cubes
Note the slight opacity the roasting lent to the lemon juice.
Directions:
- Start by roasting your lemons! I cut mine in half, but next time I'll cut them in quarters for more surface area to char. Put them in a pan under the broiler. It should take around 10 minutes, but keep your eye on them.
- When the lemons are cool enough to handle, juice them. It should be exceptionally easy.
- Combine the juice, sugar, eggs, yolks, and salt in a medium saucepan.
- Add the butter cubes and cook over low heat, whisking constantly.
- Raise the heat just a bit and continue whisking. No need to go at a breakneck pace, but keep the mixture moving. For a while it will seem like nothing is happening. Then, suddenly, it will start to thicken.
- I advise lowering the heat again to prevent scorching while you in those last moments deciding if it's done. When it holds its shape in a spoon it is done.
- Remove from the heat and press the curd through a mesh strainer to make sure there are no curdled bits.
- Set aside to cool to room temperature.
You can make a typical meringue, but I decided to make an Italian meringue (I know, I know: as if this tart didn't have enough steps and dirty dishes). The advantage of Italian meringue is mostly that it is very stable, great if your dessert won't be eaten right away. It also doesn't need to be baked after it's made.
Ingredients for Meringue: (This makes enough to cover the whole tart. I think you could half it without a problem if you just want a border like I did.)
- 2 egg whites
- 5 tbsp sugar
- a pinch of salt
- 1/4 tsp vanilla
Directions:
- Comine egg whites, sugar, and salt in a large glass bowl.
- Place over a pot of gently simmer water.
- Whisk gently until the mixture reaches 140 degrees (an instant read thermometer is ideal, a candy thermometer will do).
- Remove the bowl from heat and blend with an electric mixer on high speed.
- Add the vanilla when it begins to firm up and continue blending until it forms stiff peaks.
Now, to put it all together!
- First, coat the tart shell with about a tbsp of honey, slightly warmed so it's easier to brush on. This is to help prevent the crust from getting soggy should you not eat the tart all at once. Though the flavor is not really noticeable, I like to think the honey complements the smoky lemons.
- Spoon the lemon curd into the tart shell and smooth it with a spatula.
- Transfer the meringue to a pastry bag (or ziplock with a corner cut off) and pipe the meringue onto the tart.
- If you piped your meringue fairly flat and are familiar with your broiler, you can put the tart under the broiler to brown. If your meringue has any height, (as mine did, ahem), or your broiler is unwieldy, I recommend putting it in a 400 degree oven for a few minutes. Either way, watch it carefully or you will find yourself plucking off burnt meringue and repiping.
- Let the tart cool completely before serving.
This tart is ideal the first day but will last up to three. It should probably be refrigerated, but I left mine on the counter of my cool kitchen and I seem to have lived. This was definitely one of the more time consuming things I've made, exacerbated by the pile of dishes it leaves in its wake, but when I took a bite of the slice I didn't care one bit.
Enjoy!
Saturday, April 2, 2011
Last Minute Banana Tart!
When I make pie dough, I often make a double batch. It's just as easy and being able to stash the extra away in the freezer for future use is worth the effort. The only trick is being sure to give it long enough to thaw. If you remember to do that, you can throw together any number of last minute tarts, like this banana tart.
- Roll out your tart dough and place it in a 9" tart pan and roll over the edges.
- Slice 2-3 large bananas in 1/4" slices and layer them in the tart shell (2-3 layers). I suppose you could just dump them in if you were really in a hurry, but we like things pretty around here.
- Whisk together 1 egg, 1/2 cup cream, 3 tablespoons powdered sugar, 1 tablespoon brown sugar, 2 shakes ground cinnamon, and 1/4 tsp vanilla.
- Pour the liquid over the bananas.
- Bake in a 375 degree oven about 30 minutes, until the crust and top is golden.
- To be decadent, serve warm with vanilla ice cream.
Enjoy!
Monday, March 21, 2011
Strawberry Rhubarb Pie
Last summer at the farmers' market, I snagged the last bunch of rhubarb and an extra carton of strawberries. I came home, washed them, cut them up, and... put them in the freezer. Normally I revel in the freshness of my farmers' market bounty but I had a plan. I knew there would be a day in the middle of winter when I would be sick of citrus and longing for the bright red flavors of spring and summer. So I squirreled them away in the back of my freezer waiting for that day to arrive.
For the (double) Crust:
- 2 1/2 cups flour
- 1 tablespoon flour
- 1 teaspoon salt
- 2 sticks unsalted butter
- 3/4 cup ice water
Combine the first three ingredients. If your kitchen is warm, chill the (metal or glass) bowl and the dry ingredients in the freezer. Cut your butter into small pieces by quartering the stick lengthwise and then chopping it. Make sure the butter is cold; return it to the refrigerator if necessary. Add the butter pieces to the flour and begin to work it with a pastry blender. Continue cutting the butter into the flour until it is approximately pea-sized. The dough should start to show the path of the pastry blender.
Add 1/2 cup of the water. With a spatula, gently scoop the dough and fold in the water. You're not stirring, mashing, or mixing: you don't want the butter getting any smaller. Continue adding water one tablespoon at a time until the dough is just wet enough that it can be pressed into a ball. Use your hands to pull it together and press it into one solid mass. Wrap the dough in plastic and chill it for thirty minutes. This is a good time to make the filling.
For the Filling:
- 2 cups strawberries, halved or quartered
- 2 cups rhubarb, trimmed and cut into half inch slices
- 1/4 cup firmly packed brown sugar
- 1/2 cup sugar
- 3 tablespoons cornstarch
- 2 tablespoons lemon juice.
Comine all ingredients, stir, and let sit.
Back to the crust. Cut the dough into two pieces and gently press each into a circular disc. Place one disc on a well-floured surface and return the other to the fridge. Sprinkle flour on top of the dough and onto your rolling pin. Begin rolling out the dough. Try to only roll in one direction rather than back and forth: work from the middle and roll outwards. Flip and rotate the dough frequently, adding flour a needed, to keep if from sticking and to ensure even thickness. You should notice large flecks of butter throughout the dough. If not, the dough will be less flaky and be sure to cut your butter less next time.
When the dough is about 1/8" thick, gently lift it into your pie pan. Cut off excess dough and roll the edges over, crimping however you desire. Pour the filling into the crust and put the pie in the fridge. What you do next depends on what kind of top crust you want. You can roll out the second crust and put it whole on top, you can cut it into strips and make a lattice crust, or you can cut it into decorative shapes. Planning ahead, I had originally cut my dough into two uneven pieces, rolling out the larger one. This left larger scraps to cut off the edge which I used to make decorative leaves. The (smaller) remaining disc of dough will be saved for another project.
Finally, brush your top crust with some egg wash (egg mixed with a tiny bit of water) and bake in a 375 degree oven for about 1 hour, until the filling is thoroughly bubbly and the crust is golden. Serve warm.
Enjoy!
Thursday, March 3, 2011
Poached Pear Frangipane Tart
When winter leaves you craving fruit but your tongue is tingling from all of the citrus, the mild sweetness of juicy pears is just the thing to fill the void. This tart features a tender crust, the rich nuttiness of almond frangipane, and the winter freshness of poached bosc pears.
Ingredients:
For the Poached Pears: Note that these not traditional poached pears, not the warm wine poached pears that are often featured on their own as dessert. Really, it's closer to a marinade, but poached pears is more alliterative.
- 1-2 bosc pears, depending on size (also depending how much fruit you want on your tart. I used two small ones for the tart pictures, minus a few slices that I snacked on.)
- 2 cups water
- 1 cup sugar
- 1/2 cup Lillet Blanc (optional, but lovely)
- 1 vanilla bean, split, seeds scraped out.
- Zest of one orange
- 3 oz unsalted butter, cut into pieces
- 1 tbsp vegetable oil
- 3 tbsp water
- 1 tbsp sugar
- 1/8 tsp salt
- 1 rounded cup flour
For the Frangipane:
- 1/2 cup ground almonds (I used sliced almonds, toasted them just slightly, and ground them in my mini food processor. Don't use almond flour, it's too fine.)
- 1/4 cup sugar
- 1 egg
- 3 tbsp softened butter
- 1 tbsp flour
- 1/2 tsp vanilla extract
Directions:
- Slice and peel the pears. They should be ripe all the way through, but still firm.
- In a small sauce pan, combine water, sugar, vanilla bean (seeds and pod), and orange zest.
- Simmer until the sugar is dissolved.
- Stir in the Lillet.
- Place the pears in a shallow bowl and pour the mixture over.
- Leave the bowl on the counter until it has cooled to room temperature, then cover and refrigerate for a minimum of two hours. Longer is better (overnight would be great).
- Make the tart crust, according to the instructions in the link.
- For the frangipane, after the almonds are coarsely ground, add the remaining ingredients to the food processor and pulse until everything is blended.
- Press the tart dough into a 9" tart pan.
- Spoon the frangipane into the tart and spread until it's even.
- Fish the pear slices out of the sauce. Strain the sauce and set aside.
- Press the pear slices gently into the frangipane.
- Bake the tart on a sheet pan in a 350 degree oven for about 30 minutes, until the crust and frangipane is slightly golden and firm in the center.
- Let the tart cool.
- While the tart is cooling, return the reserved sauce to the stove. Reduce over low heat until the syrup thickens slightly, about ten minutes. While still warm, brush the syrup over the top of the tart for a lovely sheen.
This tart is lovely for dessert, but absolutely perfect for tea. The floral notes of the orange, vanilla, and Lillet will be wonderfully complemented by a cup of Earl Grey. Enjoy!
Thursday, August 19, 2010
Currant Confections Cultivate Contentment
There I was at the farmers market, loading up on the usual additions to round out my CSA-- a few of the first squash, some blueberries, some scallions-- and then I saw them: bright red jewels glinting in the sun, beckoning me to come scoop them up into my basket. I was powerless against their lure. Never mind the fact that I had never cooked with fresh currants (I'm not sure if I'd ever even really eaten them), that was a problem for another time, like when I got home.
Saturday, July 31, 2010
Oatmeal in the summer? Why, yes indeed!
Try substituting half of the water with coconut milk. If you're in the mood, add a dash of vanilla. When it's done, add the tiniest sprinkle of brown sugar, some toasted almonds, and a handful of fresh blueberries. Brew some good coffee and you're set for a day of summer adventures.
Enjoy!
Thursday, July 8, 2010
Buckwheat Walnut French Toast with Fresh Blueberry Sauce
I very much enjoy French toast for an indulgent breakfast. Though it's always very tasty with a classic, good quality white bread, I also recommend trying it with a heartier bread for a different take. Here I used a buckwheat walnut bread. Buckwheat, despite it's name, it's not actually a variety of wheat, not being a cereal or grass like wheat, but is considered a psuedocereal like quinoa or amaranth. It is commonly used in blinis, savory crepes sarrasin, and soba noodles. It has a rather earthy taste and contains no gluten, meaning that buckwheat breads usually contain wheat flour as well.
I prepared this just as I prepare any other French toast. However, since it's less light and airy than a white bread, you may want to prepare more of the liquid mix (and be sure to give it enough time to soak). For the sauce, I simply combined nearly a pint of blueberries with a small spoonful of sugar and a drizzle of water, then let them simmer until they broke down into a sauce, stirring occasionally. I left it chunky and fruity, but you could cook it longer and/or mash it up and strain it for a more true syrup.
Enjoy!
Thursday, April 1, 2010
Tropical Pork Chops
Tropical pork chops? That sounds straight out of a housekeeping magazine from the 50s, some gimmicky dish involving pineapple and toothpicks. Instead, it's the perfect example of how to create a dish out of a craving and what you find in your freezer.
Here's the story: One day I came home from work and I was hungry. Hmmm, it's been a while since I've been to the grocery store. Nothing immediately jumps out at me. I could really go for some fruit, but... I'm all out. Open the freezer, stare, shuffle things around, stare some more... Hey, frozen mango! But... that's not really dinner. Hey, pork chops! Pork chops, then mango? No. Pork chops AND mango! And hey! Some leftover coconut milk from the best french toast I've ever made. So, I went at it.
- Chop up an onion to sauté on medium heat.
- When it's starting to soften, add some mango and bell peppers. Frozen mango is perfect for this. The bell peppers would be better fresh.
- Scoot everything to the side and turn up the heat for a moment, then add a salted and peppered pork chop*.
- Let the meat sear a bit, then flip it over.
- Turn down the heat and add some coconut milk, stirring with the mango and veggies.
- Let the mix simmer until the pork chops are cooked through.
- Serve immediately, optionally on a bed of rice.
* Note that I used a boneless, thin cut pork chop. These are great to have around because they defrost and cook quickly. You could certainly use pork chops on the bone, but I would recommend cooking them separately first, then finishing it in the sauce as they will take much longer.
Enjoy!

Wednesday, October 7, 2009
Martha's Peach Cornmeal Skillet Cake
The lovely Peach Cornmeal Upside-Down Skillet Cake
Okay, I confess: this recipe is not a Rori original, but instead comes from Martha Stewart. Find the original recipe here. For such a beautiful and delicious cake, it's quite easy to make.
Ingredients:
- 2 medium peaches (I had giant peaches and used just over one)
- 1 cup cornmeal
- 3/4 all-purpose flour
- 1 tsp baking powder
- 1 1/4 tsp coarse salt
- 1 1/2 tsp dried lavender (optional, so no need to tear open the sachets in your underwear drawer if you can't find it)
- 1 stick + 3 tablespoons butter, unsalted (though I used salted for the 3 tbsp)
- 1 cup sugar (I used a blend of about 2/3 white and 1/3 brown)
- 3 eggs
- 1/2 cup heavy cream (I used light cream because I had it on hand, and it turned out fine, though heavy cream would likely make it a bit more decadent)
- 1/2 tsp vanilla extract
A close-up of the caramelized crust.
Prepping (measuring, chopping, etc.) all of your ingredients ahead of time is always a good idea. With this recipe it is extra helpful, if not essential.
Directions (in my words):
- Preheat your oven to 350.
- Slice your peaches, leaving the skin on. I got about 12 slices out of each peach.
- Heat 3 tbsp butter in a cast iron skillet on medium heat, brushing some along the sides as it melts.
- When the butter is fully melted, sprinkle 1/4 cup of the sugar evenly around the pan. It will melt and begin to bubble after about three minutes.
- Quickly but carefully place you peaches in the pan in a decorative manner. Place them as close as you can to each other, even slightly overlapping as they will reduce as they cook. Avoid moving them once placed.
- Reduce the heat to low and cook for about 10 minutes. The peaches will soften and their juices will be bubbling with the sugar. Remove the pan from the heat when they are done.
- In a large bowl combine cornmeal, flour, salt, baking powder, and lavender (crushed and/or roughly chopped).
- Add one stick of softened (room temperature) butter. Beat at high speed for about three minutes. The mix will look crumbly but fluffy.
- Beat in eggs one at a time until fully blended at medium speed.
- Add combined cream and vanilla, half at a time, blending at low speed.
- Drop large spoonfuls over the peach and suger mix in the skillet. Avoid mixing any of the peach liquid in with the batter, as you want it to remain on top to form a nice glaze.
- Gently spread the batter evenly in the pan, going all the way up to the edge.
- Put in the oven to bake. Martha recommended 20-22 minutes but mine required about 30. Start checking it after 20, looking for a golden brown color. A knife or toothpick inserted in the middle should come out clean.
- After the skillet is removed from the oven, let it stand for about ten minutes.
- Run a knife or spatula around the edge of the cake to make sure it's loose, then quickly flip your cake onto a plate. Give the bottom of the pan a few firm pats to ensure the peaches have come off, then unveil your creation!
Enjoy!
- Rori
Subscribe to:
Posts (Atom)