Saturday, April 30, 2011

Green Bean Ricotta Tart


This isn't exactly the prettiest tart I've ever made.  My tart pan was otherwise occupied and I was feeling impatient, so I decided to try it free form.  It was, however, quite tasty.  I decided to improvise a savory whole wheat version of my favorite tart dough.  It turned out quite well and I look forward to using it frequently in the future.

Ingredients for the Tart Shell:
- 6 tbsp butter, cut into pieces
- 2 tbsp olive oil
- 3 tbsp water
- 1 pinch salt
- 1/2 cup flour
- 1/2 cup whole wheat flour

Directions:
- Combine all ingredients except the flour into an oven safe bowl.
- Put in a 400 degree oven for 15 minutes.
- Carefully remove the bowl, add the flour, and stir with a wooden spoon until a dough is formed.
- Let the dough cool until it is safe enough to handle.
- Transfer the dough to your tart pan (or baking sheet) and gently press it out and up the sides.
- Prick all over with a fork, especially the corners.
- Return the tart shell to the oven for 10 minutes.
- Let the tart shell cool.


This tart dough is slightly on the crumbly side, but I really liked it as a savory tart base.  While pie dough and puff pastry are decadently flaky, this had a lovely rustic earthiness that I enjoyed.  If I were to make it again, though, I would use a tart pan and keep the sides very thin, eliminate the sides, or make more filling to balance it out.


Ingredients:
- Green Beans
- 2 garlic cloves, roasted
- 1/2 c. ricotta cheese
- 1 egg
- 1/2 tsp salt, dash of pepper, dash of paprika
- olive oil

Directions:
- Start by roasting the garlic by wrapping the cloves in tin foil and baking them (in the toaster oven) for about ten minutes.
- Trim the green beans.
- Parboil the green beans for about 2 minutes.  Remove from the water and let cool.
- Stir together ricotta cheese, egg, pepper, and paprika.  Add the garlic, using a garlic press to make sure it is easily mixed in.
- Spread the cheese mix onto the tart shell.
- Gently place the green beans on top of the cheese mix.  No, I didn't spend an hour at the grocery store picking out the straightest green beans I could find.  I did get some extra, though, and left off any of the severely bent.
- Brush the green beans with some olive oil and sprinkle with a little additional salt.
- Bake at 375 for 25 minutes, then pop under the broiler to brown the top.

Serves 4-6 with salad for a meal, or cut smaller for appetizers.

Enjoy!

Wednesday, April 27, 2011

Whole Wheat Pasta with Fresh English Peas and Garlic Scapes


A quick weeknight meal is enlivened with fresh springtime ingredients.  English peas are available for only a short time, so get them while you can (and have fun shelling them!).  Garlic scapes are the green, plant part sprouting out of the garlic bulb we usually use-- you may have seen them when you've left a forgotten clove of garlic sitting around too long.  Use them like garlic, though they are milder and less spicy.
  • Shell your peas and mince your scape (one will do).
  • Bring a pot of water to boil and get your pasta cooking.
  • Drizzle some olive oil in a large pan and add the scapes and a dash of salt; saute over medium heat.
  • After a minute, add the peas and continue cooking.
  • When the pasta is just al dente, add it to the pan and toss.
  • Add some arugula or fresh spinach and cook just until wilted.
  • Squeeze some lemon over the dish and sprinkle with some parmesan.
Serve and enjoy!

Sunday, April 24, 2011

Gateau Basque


The cherry tree outside my house has bloomed.  It's wonderful to step outside on my balcony and be surrounded by their delicate, pastel beauty.  It also reminded me of a dessert I've been meaning to make: Gateau Basque.

Gateau Basque originates from the Basque region along the border of France and Spain.  It's something between a cake and a tart: the dough is slightly flaky, but also tender and crumbly.  Traditionally it is either filled with pastry cream or cherry preserves, which is what triggered the memory.

As I sit writing this on a particularly rainy afternoon, (hoping all the while that the cherry blossoms aren't washed away so soon), I am reminded of another rainy afternoon when I first tasted Gateau Basque in Bayonne, France.


After a day of touring the city, I sat down under an awning outside a cafe not far from where this photo was taken.  The rain gently fell and I ate my slice of gateau basque and savored the quaint moment.  The street was quiet, the sleepy afternoon rain causing most people to retreat inside.  It was peaceful and I remember feeling content.  Recreating Gateau Basque in my own kitchen may not recreate that same exact feeling, but I remembered it with every bite.


I used Dorie Greenspan's recipe and found it to be a wonderful version, very close to how I remember it.  Note that I used a larger pan than she did (9" instead of 8") so my layers are slightly thinner than ideal.  It was certainly still delicious, but next time I will seek out a smaller pan.

Ingredients:
- 10 tbsp butter (1 1/4 stick)
-1/4 c. sugar
- 1/4 c. brown sugar
- 1 egg
- 1/2 tsp. vanilla
- 2 c. flour
- 3/4 tsp. baking powder
- 1/8 tsp. salt
- 3/4-1 c. good quality, thick black cherry jam (or pastry cream)
- 1 egg, beaten for glaze


Directions:
- Make sure your butter is at room temperature.  To speed this up, slice the butter up and spread it out on a plate.
- Combine the butter and sugars and beat on medium speed until blended and smooth.
- Add the egg and vanilla and beat an additional three minutes.
- Combine the flour, baking powder (no lumps!), and salt.
- Add the the dry ingredients to the wet in about three portions, blending on low just until combined.
- Divide the dough into two portions, gently formed into discs.
- Place each disc between sheets of plastic wrap and gently roll each disc out to the size of your pan.  I recommend making the bottom disc just slightly larger (about 1/2") than your pan so it will curl up a little at the sides.  Be sure to flip the disc often and straighten the plastic so it doesn't become embedded in the dough.  Rotating the dough as your roll it and rolling from the center outward will help you keep them evenly round.
- Refrigerate the dough until it firms up a bit, about an hour (unless your kitchen is particularly warm).
- Preheat your oven to 350.
- I recommend using a spring-form pan for easy removal.  This is about the only item for which I like non-stick.  If your pan is not non-stick, butter the inside generously.
- Gently lower the first (larger) disc into the bottom of the pan.
- Spoon your jam evenly onto the dough, leaving a 1" border around the edge.
- Place the second disc on top of the jam and gently press the edge down.  It will seal as it bakes, so no need to be vigorous here.
- Brush the top of the tart with the beaten egg (you won't use it all).  With the tines of a fork or the back of a knife, draw your desired design.  Traditionally cakes filled with cherry show the Basque cross and cakes filled with pastry cream feature a cross-hatch.
- Bake the cake for 40 minutes until evenly golden on top.
- Allow the cake to cool for 10 minutes, then remove it from the pan.


Serve at room temperature.  This cake is delicious on its own and I would discourage the temptation to top it with whipped cream or ice cream: its simplicity is a virtue.  Since the dough is not too sweet, it is suitable for brunch, tea, or dessert.  I found that it lasted well at room temperature for three days well wrapped, though humidity would take its toll.

This is a particularly quick and easy treat to make with very satisfying results.  It will certainly make a return in my kitchen, and I may even use the dough as a base for some other upcoming projects...

Enjoy!

Friday, April 22, 2011

Some Thoughts, on Earth Day


Today is Earth Day.

I talk a lot about food and what to do with it and how delicious it can be.  I don't talk a lot about where it comes from.  I do, however, think about it quite a bit.

The fact is, day by day we are becoming more removed from the food we consume, more removed from the stuff we put in our bodies to keep us alive.  We think of chickens in terms of prepackaged pieces, not animals with beaks and feathers.  In our minds lettuce comes pre-washed in plastic bags, rather than pulled dirty from the ground.  We buy our food from companies, not from people.

We are all suffering from this mindset.  Our eating habits reflect this.  But there are some who are suffering more than others: the farmers.  Their very livelihoods are being threatened.  Small, family-owned farms are closing at an unbelievable rate.  Instead, we buy our food from the same corporations that manufacture industrial pesticides.  I won't get into all of the sticky politics here, but it is largely because of a government that institutes policies that are detrimental to local farms while rewarding corporations with large subsidies to make nutritionless food.

I encourage everyone to read this account from Stillman's Farm to see just a glimpse of what these farms are up against.

While at times it may seem like a losing battle, it is not lost yet.  Here are some things we can all do:

  • Sign up for a CSA:  CSA means Community Supported Agriculture.  Basically how it works is that at the beginning of the season, you pay a lump sum for a food 'subscription'.  Most CSA's consist of vegetables and fruit (though meat and dairy are sometimes available) that you pick up on a weekly basis.  Contents of the box are generally pre-determined based on what is growing on the farm at the moment.  It is beneficial for the farmers because they get guaranteed business and strong ties to the community.  It is beneficial for the patrons because you get the freshest produce possible and are challenged to eat seasonally and try new produce.  It is also inexpensive: last year I paid around $8 a week for a bounty of vegetables.  Do your research about the CSA before you sign up: there are many, many reputable CSA's in existence, but there are a few with lose definitions of the word 'local'.
  • Get thee to a farmers' market:  There is nothing inherently 'wrong' with going to a grocery store.  There is something better about going to a farmers' market.  The produce at farmers' markets will generally be much fresher, usually picked that very morning, and also of greater seasonal variety.  You are also giving your money right to a farm, rather than a middle man, so the people working to grow this food will benefit more.  In fact, you often get to meet those very people, getting a reminder that actual human beings are responsible for making that food exist.  Like with CSA's, become informed about the farms at your local market.  The internet is a great resource and you can also just talk to the actual people.  Where is their farm located?  Do they source any of their produce from other areas?  Reselling is, unfortunately, a fairly common practice; it's not always a negative, but it can be.  What are their policies with regard to pesticides, GMO's, etc.?  Is this a farm that's knowledgeable and conscientious about their practices, or is this a large factory farm with a cute booth?
  • Buy seasonally and locally:  Do you really need tomatoes in January?  Strawberries in November?  We've become pretty spoiled with the ability to buy just about any produce, anywhere, at any time of the year.  But it has its costs: it's probably not very good, it's usually more expensive, it very likely isn't coming from a local farm,  it took a lot more resources to get it to you, and you're probably ignoring a host of other produce options to reach for the same few items.  Look, I'm not claiming I am anywhere near perfect on this front (see the mango smoothies in the post below) nor would I admonish anyone else who isn't.  However, I encourage everyone to train themselves to break some bad habits and think for a moment before putting something in their grocery basket.  Make buying out of season the exception rather than the rule.  Start by identifying a few items that are off limits when out of season: for example, I have not bought tomatoes since the farmers' market closed last year.  Research when items are actually in season and what items grow in your region and try to feature those.  Even just modifying your shopping list by a few items makes a difference.  Also seek out local businesses that make their own products.  Find a good bakery that makes their bread in-house, a locally owned fish market or butcher, or even local ice cream.
  • Get Busy:  If you have any bit of sunny space outside, grow something!  You don't have to turn into a master gardener; growing even just a few edibles is wonderful.  Not only will it result in a few items less that have to be shipped to you, (and if everybody grew something, it would certainly add up), it will remind you to appreciate the people who do this on a large scale for a living.  For beginners, I recommend Swiss Chard, Cherry Tomatoes, Arugula, and Basil.  All of these can be grown in a pot.  Even if you don't have the space to grow anything, try making from scratch some food you usually buy.  Try making your own pastacrackers, or mayonnaise.  Even just trying it once will give you an appreciation for that food and for the people who make it.  It also helps us remember that we don't actually need those factories and those convenience meals.
  • Get Informed and Involved:  There is tons of literature available about the state of our food system.  The internet is a great source for a wide variety of opinions (do look into their reliability).  Personally, I recommend picking up Animal, Vegetable, Miracle by (usually fiction) author Barbara Kingsolver and The Omnivore's Dilemma by Michael Pollan.  You certainly may not agree with everything they say, but the important part is to think about it and have engaged discussion.  Involve the people you know in this discussion: it doesn't have to be a heated debate, but even casual conversation about farms and food keeps the topic from being pushed to the back of our minds.  Stay informed about legislation affecting farms and food policies.  With RSS feeds it's pretty easy.  Contact your political representatives and voice your opinions.  Put your money where your mouth is.
Nothing will fix this problem overnight, but that doesn't mean it's not worth fixing.  I challenge everybody to make this an issue that you hold to be important.  And with that, I will step down from my soapbox

Mango Yogurt Smoothie


I picked up some delicious mangoes on sale recently.  These were 'Champagne' mangoes, different from the variety I normally get.  They were slightly smaller, very sweet, juicy, and not stringy at all.

While I usually prefer to eat my fruit whole, I couldn't resist turning one of these into a smoothie, reminiscent of lassi.  To add a little interest beyond the clean fruitiness, I added a dash a cinnamon.  This provided a richer, more rounded flavor that was unusual and very nice.


- Cut up one mango to get about 1 cup of fruit chunks
- In a blender combine the mango, 1/2 cup plain yogurt, 1 tsp honey, 1 dash cinnamon, and a pinch of salt.
- Blend until smooth.
- Add 1/2 cup ice.  Depending on your blender you may want to crush it a bit first.  Blend until the ice is crushed.

I garnished mine with a little basil leaf... and next time I'm going to try a mango basil smoothie.

Enjoy!

Wednesday, April 20, 2011

Squash Tortelloni in Brown Butter Sage Sauce


Making pasta from scratch is certainly not a quick process.  In fact, it's long and rather tiring and by the time you've folded that 50th tortelloni you're glad to be done with it.  But, at the same time, there's something simple, calming, and almost meditative about the process.  Pacing yourself while rolling the dough, reminding yourself to slow down as you fold each square of pasta: in a hurried world it's almost a luxury to take such time.  Besides...  the end result is pretty tasty.

Ingredients:
- 2 cups flour
- 2 eggs
- 1/4 c. water
- olive oil
- 4 cups cubed roasted squash: I used (I think) a Long Island Cheese Squash.  Any flavorful winter squash should work.
- 3/4 c. ricotta cheese
- butter
- fresh sage
- salt, pepper


Start by making the pasta:
- Combine the flour and 1tsp salt and make a well in the center.
- Crack the eggs into the middle, add the water and 1 tsp olive oil.  Whisk together and then stir them into the flour until a dough forms.
- Turn the dough onto a floured surface and kneed for about 10 minutes, until the dough is smooth and elastic.
- Let the dough rest for 15 minutes.
- Cut the dough into quarters and begin rolling out.
- Keeping the surface floured, roll the dough out as thin as you can.  You should get four squares at least 12 x 12" in size.  Let the sheets rest for 15 minutes.


Next make the filling:
- The squash can be roasted up to two days before.  Make sure it is completely fork tender.
- Put the squash in a large pan with 1 tbsp olive oil, 1 tbsp finely chopped sage, 1 tsp salt, and a little pepper.  Saute over medium heat while mashing the squash with a wooden spoon.  You want to further soften the squash and get the excess water out.
- When the squash is consistently mashed, gently stir in the ricotta cheese.  Taste and adjust the seasoning if necessary.
- Turn off the heat and let the filling cool.


Assemble:
- Cut your pasta into squares, approximately 3 x 3".
- Spoon approximately 1 tsp of the filling onto the middle of the square.  (If you want to make ravioli you can add a little more filling and just press another square on top.)
- Lightly wet the edge of the square and fold over opposite corners to form a triangle.
- Bring each side point into the middle and gently press to seal them together.  Mine were slightly over-stuffed, so i didn't flip up the edges per tradition, but I still liked the results.  Continue for each square.
- Make sure to place your ravioli onto a well-floured surface or parchment paper.  Let them rest in a cool place for at least 10 minutes to set before cooking.


Cook:
- Bring a large pot of water to a rolling but not violent boil.
- Gently lower the tortelloni into the pot, making sure they don't stick to the bottom.  Multiple batches will be necessary.
- Cook each batch for about 5 minutes.
- In a small pan, melt butter over medium-low heat until it begins to brown.  Add salt and a handful of sage leaves and fry them in the butter.
- Pour the browned butter and sage leaves over the tortelloni and top with just a little finely grated pecorino.  Serve immediately.


This recipe makes around 48 tortelloni, enough to serve 4-6.  They also freeze very well, uncooked.  Freeze them on a plate and transfer them to a bag once they are solid.
Enjoy!

Sunday, April 17, 2011

Super Mushroom Pizza


I love mushrooms on pizza.  But why stick to just piling them on top when you can substitute that boring old tomato sauce with a delicious mushroom concoction?  Combining different textures-- diced, sliced, sauteed, raw-- just enhances their delight even more.  The simple toppings and light sprinkle of cheese let the mushroom flavor shine through.  While I just used cremini mushrooms, you could use a variety for more complex flavor.

- In a large pan, combine 1 tbsp butter with 1 1/2 c. finely chopped cremini mushrooms.
- Brown over low heat for 5 minutes.
- Add 1/2 c. sliced mushrooms, 1 tbsp tomato paste, 1 tsp salt, and a dash of black pepper and stir gently for another minute.
- Whisk 1 tbsp flour into 1 tbsp cream.  Add to the pan with 1 c. stock (chicken or vegetable).
- Raise the heat and simmer for another few minutes until the sauce thickens and reduces a bit.  Taste and adjust seasoning if necessary.
- Turn the heat off and allow the sauce to cool a bit.
- Spread the mushroom sauce onto your favorite pizza crust.
- Top with additional raw, sliced mushrooms, thinly sliced red onion, and crumbled goat cheese.  A dash of red pepper is great if you want a little spice.
- Bake in a 475 degree oven for about 15 minutes.  You can use a pizza stone or a regular baking sheet.  A thin spray of oil under the pizza dough ensures a crisp crust and easy removal.
- Top with fresh basil when the pizza comes out of the oven.

Enjoy!

Thursday, April 14, 2011

Smoky Lemon Tart


I have long wanted to make a lemon tart and have consistently put it off.  Why?  Because once I made one, I knew it wouldn't be long before I made another, and another...  and that would get to be a problem.

Well, I had a few Meyer lemons hanging about that were just pleading to be made into a tart.  How could I refuse?  Then... inspiration.  What if I roasted these lemons?  A tart was born.  And it was good.

Roasting the lemons creates a lovely round flavor.  There's a hint of smokiness, but not enough to give the secret away.  Most people would never guess what you were up to in the kitchen.  I will advise that some may find it a little odd.  If you took a bit expecting the usual lemon curd, you might notice a difference and find it slightly off putting.  I do encourage you to take a chance on it, though.  I found the risk most definitely worth it.


Before we get to the new and exciting stuff, we must make the crust.  I used my favorite tart dough recipe, yet again.

Ingredients for the Tart Shell:
- 6 tbsp butter, but into pieces
- 1 tbsp canola oil
- 3 tbsp water
- 1 tbsp sugar
- 1 pinch salt
- 1 cup flour

Directions:
- Combine all ingredients except the flour into an oven safe bowl.
- Put in a 400 degree oven for 15 minutes.
- Carefully remove the bowl, add the flour, and stir with a wooden spoon until a dough is formed.
- Let the dough cool until it is safe enough to handle.
- Transfer the dough to your tart pan and gently press it out and up the sides.  Reserve a small piece of dough to patch any cracks after blind baking.
- Prick all over with a fork, especially the corners.
- Return the tart shell to the oven for 15 minutes until it is lightly golden.
- Upon removal patch any noticeable cracks with the reserved dough.  If you work quickly and have little feeling in your fingertips, you can add it instantly and it will cook right on.
- Let the tart shell cool.

Now, on to the fun part!

As with roasting a marshmallow, a bit of char is desired. 

Ingredients for the Lemon Curd:
- 1/2 c. lemon juice (about four small), preferable Meyer lemons: their flavor is lovely, if less tart.  Regular lemons may be used, but the sugar should be increased a bit.
- 1/3 c. sugar
- 2 eggs
- 2 egg yolks (set the whites aside for the meringue below)
- a pinch of salt
- 6 tbsp butter, cut into 1/2" cubes

Note the slight opacity the roasting lent to the lemon juice.

Directions:
- Start by roasting your lemons!  I cut mine in half, but next time I'll cut them in quarters for more surface area to char.  Put them in a pan under the broiler.  It should take around 10 minutes, but keep your eye on them.
- When the lemons are cool enough to handle, juice them.  It should be exceptionally easy.
- Combine the juice, sugar, eggs, yolks, and salt in a medium saucepan.
- Add the butter cubes and cook over low heat, whisking constantly.
- Raise the heat just a bit and continue whisking.  No need to go at a breakneck pace, but keep the mixture moving.  For a while it will seem like nothing is happening.  Then, suddenly, it will start to thicken.
- I advise lowering the heat again to prevent scorching while you in those last moments deciding if it's done.  When it holds its shape in a spoon it is done.
- Remove from the heat and press the curd through a mesh strainer to make sure there are no curdled bits.
- Set aside to cool to room temperature.


You can make a typical meringue, but I decided to make an Italian meringue (I know, I know:  as if this tart didn't have enough steps and dirty dishes).  The advantage of Italian meringue is mostly that it is very stable, great if your dessert won't be eaten right away.  It also doesn't need to be baked after it's made.

Ingredients for Meringue: (This makes enough to cover the whole tart.  I think you could half it without a problem if you just want a border like I did.)
- 2 egg whites
- 5 tbsp sugar
- a pinch of salt
- 1/4 tsp vanilla

Directions:
- Comine egg whites, sugar, and salt in a large glass bowl.
- Place over a pot of gently simmer water.
- Whisk gently until the mixture reaches 140 degrees (an instant read thermometer is ideal, a candy thermometer will do).
- Remove the bowl from heat and blend with an electric mixer on high speed.
- Add the vanilla when it begins to firm up and continue blending until it forms stiff peaks.


Now, to put it all together!
- First, coat the tart shell with about a tbsp of honey, slightly warmed so it's easier to brush on.  This is to help prevent the crust from getting soggy should you not eat the tart all at once.  Though the flavor is not really noticeable, I like to think the honey complements the smoky lemons.
- Spoon the lemon curd into the tart shell and smooth it with a spatula.
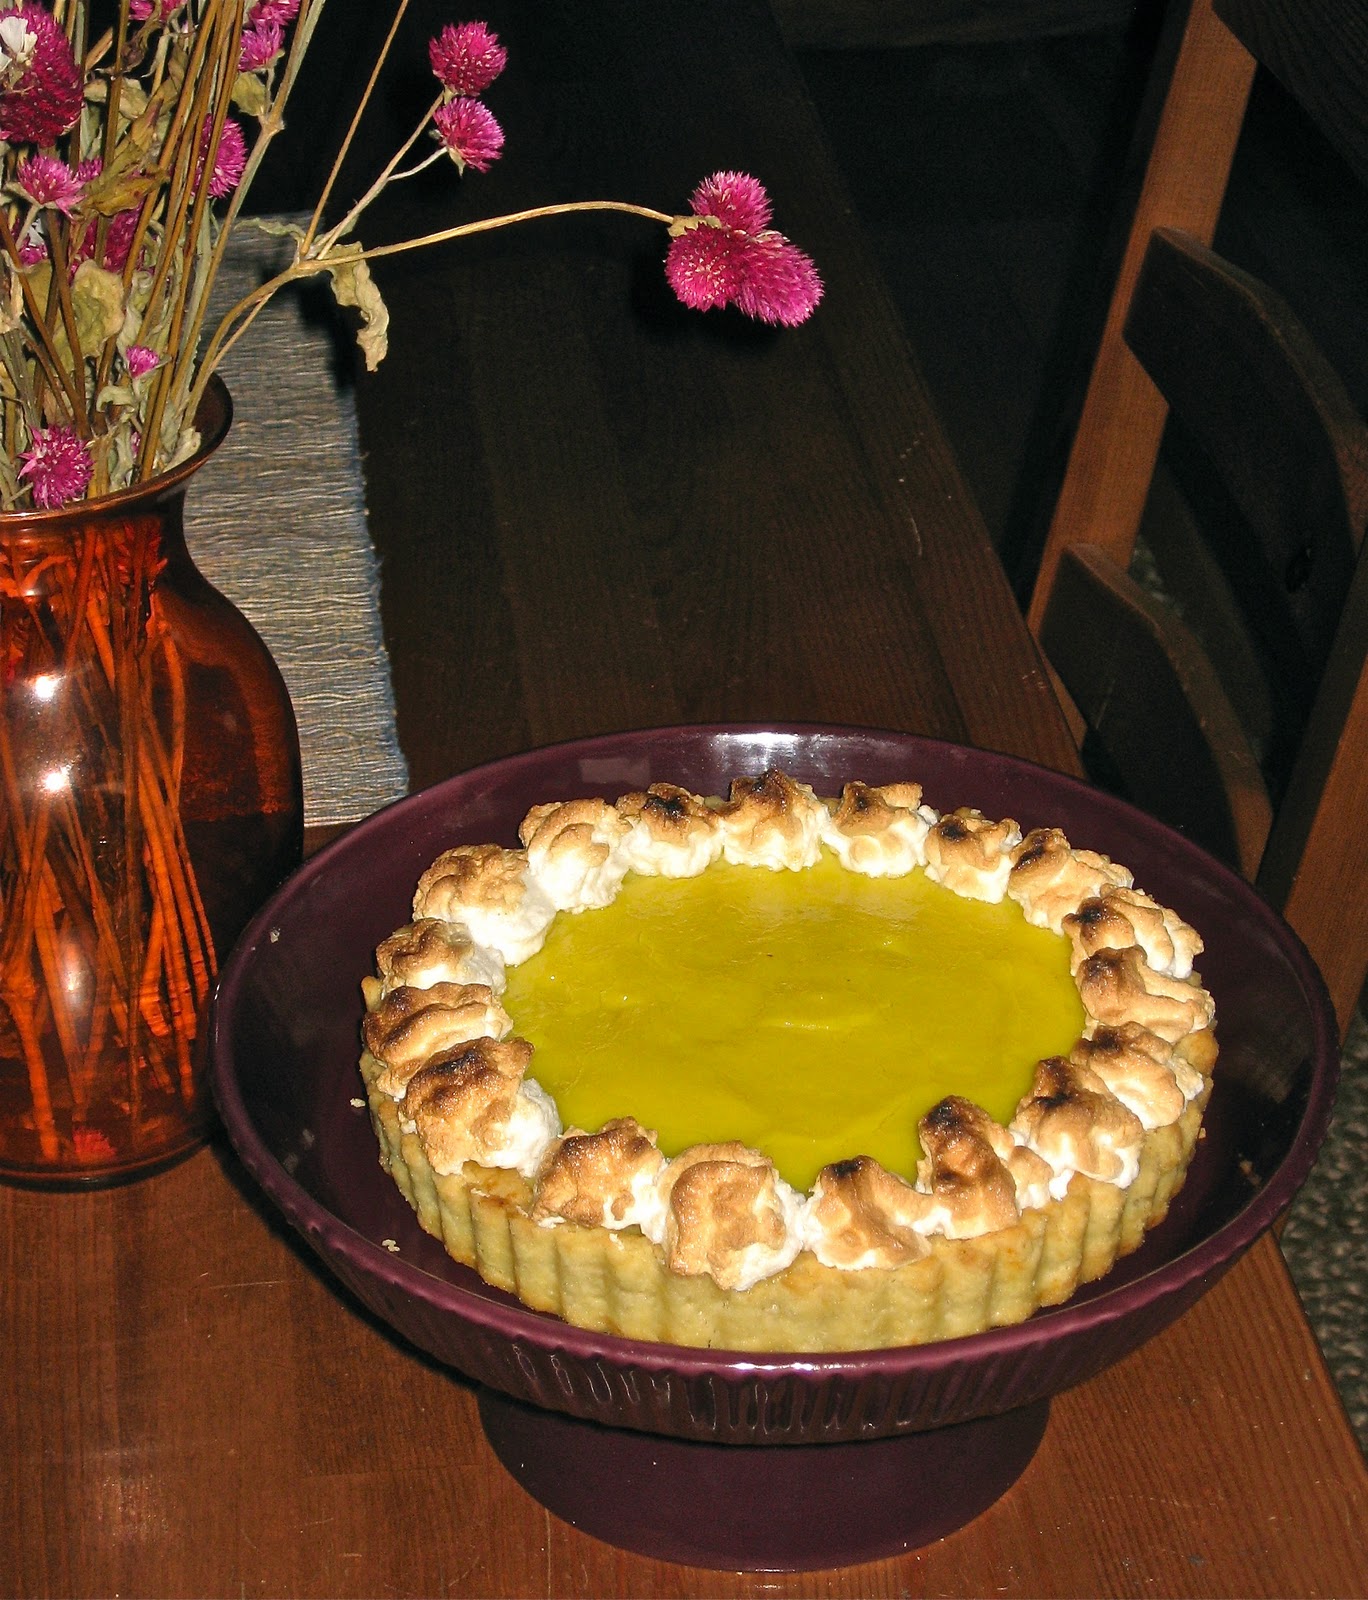
- Transfer the meringue to a pastry bag (or ziplock with a corner cut off) and pipe the meringue onto the tart.
- If you piped your meringue fairly flat and are familiar with your broiler, you can put the tart under the broiler to brown.  If your meringue has any height, (as mine did, ahem), or your broiler is unwieldy, I recommend putting it in a 400 degree oven for a few minutes.  Either way, watch it carefully or you will find yourself plucking off burnt meringue and repiping.
- Let the tart cool completely before serving.

This tart is ideal the first day but will last up to three.  It should probably be refrigerated, but I left mine on the counter of my cool kitchen and I seem to have lived.  This was definitely one of the more time consuming things I've made, exacerbated by the pile of dishes it leaves in its wake, but when I took a bite of the slice I didn't care one bit.

Enjoy!

Monday, April 11, 2011

Broccoli Rabe over Couscous


I have been on a major broccoli rabe kick lately.  Leafier that broccoli but more substantial than most greens, this vegetable is lovely as the side or feature of any meal.

Broccoli rabe can have a tendency towards bitterness.  I often find that this can add to a dish and is a welcome variance from the usual flavors, but occasionally it can overwhelm.  I recommend looking for younger broccoli rabe when you can.  Look for smaller leaves and especially smaller crowns.  It may be my imagination, but using it quickly rather than letting it linger in the crisper drawer also seems to help.  Lastly, parboiling is suggested.

Here I serve it in a simple, healthy preparation over whole wheat couscous with some tomatoes I had canned last summer.  This makes two servings.

Ingredients:
- 1 c. whole wheat couscous
- 1 c. + 1/4 c. chicken broth, vegetable broth, or salted water
- Juice of 1/2 lemon
- 1 garlic clove, minced
- 1 c. chopped tomatoes with juices (fresh or good quality canned)
- 1 bunch broccoli rabe
- Salt and pepper

Directions:
- Set a large pot of water on the stove to bring to a boil.
- In a large pan, add a drizzle of olive oil and the garlic to brown.
- Add the tomatoes, with all of their seeds and juices, and bring to a low simmer.  If you are using fresh tomatoes, simmer for 15-20 minutes until the tomatoes are cooked and soft.  There should be a nice pool of liquid:  optionally add 1/4 c. broth if it seems dry.  Season with salt and pepper to taste.
- When the water is boiling, add the broccoli rabe, stems trimmed, and cook for about three minutes.
- Transfer the broccoli rabe to the pan with the tomatoes, adding an extra dash of salt, and continue to simmer.
- Bring 1 c. of broth or water to boil with the lemon juice (the microwave is useful here) and pour it over the couscous in a bowl.  Cover and let sit five minutes.
- Divide the couscous between two plates and make a large well in the center.
- Spoon tomatoes into each well and place the broccoli rabe on top.  Pour the juices over the vegetables.

Enjoy!

Friday, April 8, 2011

Adventures in Bread Making

A little (okay, a lot) late to the party, I have jumped on the "No Knead Bread" bandwagon.  I was skeptical, (kneading isn't hard, what's the big deal?), but it's incredibly easy, relatively mess-free, and the end result is quite good.  If you aren't lightyears ahead on me on this, (and you probably are), go ahead and give it a try.  Find the original recipe here.  The great thing is the recipe seems quite forgiving and you can have fun playing with different flours and flavors.


My first attempt!  I just use normal, active dry yeast instead of the instant yeast listed in the ingredients.  I use a rounded 1/4 tsp and the results seem fine.  My dutch oven is also about half the size as recommended and I don't think it mattered one bit.


For my second attempt, I substituted 1/3 of the all purpose flour with whole wheat flour.  It also turned out well, but a little bland.


For my last attempt, I stuck with the cup of whole wheat flour.  I also upped the salt to 2 tsp, added 2 tbsp honey to the water, and added about 1/8 cup each of wheat bran and wheat germ, with an additional 1/4 cup water to compensate.  This was my favorite yet.

Give it a try: you won't be disappointed!

Tuesday, April 5, 2011

Chicken in Milk with Asparagus


I read rave reviews for Jamie Oliver's Chicken in Milk and it sounded too interesting to pass up.  I had a couple chicken legs that I was thinking of making Coq au Vin with, but that will have to wait for another time.  It's a very easy recipe that tastes like it took hours to make.  I served it with some fresh asparagus, which complimented it perfectly.

Ingredients:
- 2 chicken legs, totaling about 1 pound
- Salt and pepper
- 2 tbsp butter
- 1 tbsp olive oil
- 1 cinnamon stick
- 4 garlic cloves
- Zest of one lemon
- Your choice of fresh herbs: Sage or Rosemary recommended
- 1 cup milk

Directions:
- Pat dry, generously salt, and lightly pepper the chicken legs.
- Heat a heavy, ovenproof pot (preferably with a lid) then add the butter and olive oil.
- Add the chicken legs, one at a time if necessary (they need to have full contact with the bottom of the pot) to brown.  They should be loudly crackling.
- Turn them once to brown the other side.
- When the chicken is golden, pour off the excess liquid.  I recommend pouring it over some asparagus, to be roasted in the oven for about 10 minutes.
- Add the cinnamon stick, whole garlic cloves, lemon zest, herbs, and milk.  If you can find Meyer lemons you can cut the peel off in large chunks, which make for tasty bites.  If using regular lemons I recommend zesting it with a microplane, being careful not to include any of the pith.
- Cover the pot (use tinfoil if there's not a lid) and bake for 30 minutes at 375.  Cook an additional 20-30 minutes uncovered.

The sauce that results is very delicious, though a bit odd to look at: the lemon peel will cause the milk to form little curds.  Be sure to fish out the garlic cloves and spread them over a thick slice of bread.

I have since also tried the recipe with a whole chicken as was originally intended.  I have to say, I much preferred the chicken legs.  They were not only easier to deal with but were much more flavorful.  However, the whole chicken did result is some tasty leftover dishes.


I sauteed some of the leftover chicken with a chopped red onion and some ruby chard (stems included), as well as some of the leftover sauce.  After adjusting the seasoning it was a nice, homey dish.

Enjoy!

Saturday, April 2, 2011

Last Minute Banana Tart!


When I make pie dough, I often make a double batch.  It's just as easy and being able to stash the extra away in the freezer for future use is worth the effort.  The only trick is being sure to give it long enough to thaw.  If you remember to do that, you can throw together any number of last minute tarts, like this banana tart.

-  Roll out your tart dough and place it in a 9" tart pan and roll over the edges.
- Slice 2-3 large bananas in 1/4" slices and layer them in the tart shell (2-3 layers).  I suppose you could just dump them in if you were really in a hurry, but we like things pretty around here.
- Whisk together 1 egg, 1/2 cup cream,  3 tablespoons powdered sugar, 1 tablespoon brown sugar, 2 shakes ground cinnamon, and 1/4 tsp vanilla.
- Pour the liquid over the bananas.
- Bake in a 375 degree oven about 30 minutes, until the crust and top is golden.
- To be decadent, serve warm with vanilla ice cream.


Enjoy!