Saturday, March 12, 2011

Homemade Wheat Crackers

I don't regularly buy crackers at the store.  I usually find them overpriced and looking at their labels often reveals less than ideal ingredients.  But every now and then I get a craving that nothing but a crisp cracker can fulfill.

So I googled, specifically looking to find a substitution for those savory but slightly sweet, square wheat crackers.  You know the ones.  Well, it turns out that they're pretty much just whole wheat pie dough.  I settled on this recipe as a starting point.


Ingredients:
  • 1 1/4 cup whole wheat flour  (I would definitely recommend using whole wheat for this recipe.  It gives the crackers a wonderful nuttiness.)
  • 1/2 tsp sea salt, plus more for sprinkling
  • 1/4 tsp paprika
  • 4 tbsp butter
  • 1 1/2 tbsp honey
  • 1/4 cup cold water
  • 1/4 tsp vanilla
Steps:
  1. Combine all dry ingredients.
  2. Cut your butter into 1/2" pieces and add to the flour mixture.
  3. Either use a pastry blender or a food processor to blend the butter into flour.  Generally when you make pie dough, you want the butter to be cut into 'pea-sized' pieces.  Go a little finer for these crackers, as large flecks of butter in the dough will just burn.  This makes this recipe ideal to make in a food processor, (even a mini one), even though usually I prefer to make pie dough by hand.
  4. Combine the wet ingredients and incorporate them into the dry.  Mix just until the dough can be pressed together.
  5. Let the dough rest and, unless you're working in a frigid kitchen in a New England winter (ahem), put it in the fridge for twenty minutes.
  6. Cut the dough into four pieces.
  7. Place one piece onto parchment paper sprinkled with flour.
  8. Roll the dough out as thin as possible, incorporating flour as needed to prevent it from sticking.  Be sure to flip and turn the dough frequently in the beginning (it will be more difficult later).
  9. With a sharp knife, cut the dough into the desired size of crackers and sprinkle with sea salt.
  10. Slide the parchment paper onto a baking sheet and put into a 400 degree oven.  Watch the crackers closely.  Mine took right about 6 minutes.  Too little time and they will be slightly chewy.  Too long and they will burn.  There will inevitably some that are darker than other: any with a bit more butter, those closer to the edge.  They're still tasty.
  11. Repeat for the remaining pieces of dough.
  12. When crackers cool, gently separate them and pack them away for storage.
In a nice jar, these crackers can make a lovely hostess gift.
A few notes on this recipe:  I found the crackers to be quite buttery.  While this might be nice for a dinner party or more special occasion, I thought they were a bit too rich for day to day snacking.  Next time I will try reducing the butter (maybe 3 tablespoons?) or replacing perhaps half the butter with olive oil.  This recipe would also be ideal for incorporating some fresh herbs, like rosemary or thyme, for lovely flavor.

Enjoy!

Wednesday, March 9, 2011

Gourmet Grilled Cheese


Sometimes the simplest meals can be the most satisfying.

Thin slices of a quality white bread to keep things light.  Generous slices of delicious brie and a hearty spread of fig jam.  Toast it in the oven until crisp outside and warm and melty inside.

Serve alongside a mix of fresh sprouts, dressed lightly with a wholegrain mustard vinaigrette.  Add a few green olives for the perfect balance of sweet and salty.

Finish it off with a glass of rose or a square of gourmet dark chocolate.  Sit back and smile.

Sunday, March 6, 2011

No Soup for You!

Soup is perhaps the greatest food.  You take take any number of odds and ends, combine them, and end up with a delicious, comforting meal.  Most of the time I make my own soups, working from basics like beef stew, chicken soup, or vegetable purees.  Now and then I consult a recipe for something new.  That's what reminded me of Mulligatawny.

There seem to be endless variations on Mulligatawny.  This is likely because it's not really an 'authentic' recipe: rather it was a vague British interpretation of several Indian soups.  Some seem thick and stew-like, with a page long list of ingredients.  Others are thin, broth-y soups that rely on spices for their presence.  I chose one of the latter persuasion, found here.


Since I stashed away a rather ridiculous amount of turkey broth in my freezer from Thanksgiving, half of the work was done for me and the soup took little time to put together.  (A tip of freezing stock:  after you've simmered your poultry, separate the stock into some that's just broth and some that is broth and meat.)  In fact, the only critical ingredient I was missing was turmeric, (I lacked some other spices but made do without).  This recipe is especially great because, as it's so simple and fast, it can easily be adjusted to any amount-- even a single serving.

Ingredients (that made it into mine)

  • Turkey or chicken stock with meat
  • Garlic cloves, peeled and sliced
  • Ginger, peeled and sliced
  • Salt
  • Turmeric
  • Black pepper
  • Cumin
  • Chile Powder
  • Coriander (I didn't use coriander, but did throw in a bit of fennel seed and caraway)
  • Yellow Onions
  • Lemon
I added:
  • Paprika
  • Celery
  • Kale
  • Greek Yogurt, for serving
Instructions:
  1. Once you have your stock, add all spices.  Be careful adding salt if you don't remember the content of what you're starting with.
  2. Add half of onions to stock.
  3. Simmer for 30 minutes.
  4. Chop remaining onion, celery, and kale.  Sautee in a pan with a drizzle of olive oil and an extra dash of turmeric until onion begins to become translucent.
  5. Add onion mix to soup and simmer for 15 minutes.
  6. Serve with a generous dollop of greek yogurt and a dash of paprika.
This soup was delicious and warming, without being heavy.  For more heartiness, you can serve it with rice or add to the soup itself.  Lentils, chickpeas, or more vegetables would definitely complement this dish.  Beside a lovely new soup base to work with, I also found a new love for turmeric which has found its way into many other dishes.

Enjoy!

Thursday, March 3, 2011

Poached Pear Frangipane Tart


When winter leaves you craving fruit but your tongue is tingling from all of the citrus, the mild sweetness of juicy pears is just the thing to fill the void.  This tart features a tender crust, the rich nuttiness of almond frangipane, and the winter freshness of poached bosc pears.

Ingredients:
For the Poached Pears: Note that these not traditional poached pears, not the warm wine poached pears that are often featured on their own as dessert.  Really, it's closer to a marinade, but poached pears is more alliterative.
  • 1-2 bosc pears, depending on size (also depending how much fruit you want on your tart.  I used two small ones for the tart pictures, minus a few slices that I snacked on.)
  • 2 cups water
  • 1 cup sugar
  • 1/2 cup Lillet Blanc (optional, but lovely)
  • 1 vanilla bean, split, seeds scraped out.
  • Zest of one orange
1 Recipe David Lebovitz's French Tart Dough, found here.  This is truly a wonderful, foolproof recipe that can open up a world of tarts to those who feared making the oft-dreaded crust.

  • 3 oz unsalted butter, cut into pieces
  • 1 tbsp vegetable oil
  • 3 tbsp water
  • 1 tbsp sugar
  • 1/8 tsp salt
  • 1 rounded cup flour
For the Frangipane:
  • 1/2 cup ground almonds (I used sliced almonds, toasted them just slightly, and ground them in my mini food processor.  Don't use almond flour, it's too fine.)
  • 1/4 cup sugar
  • 1 egg
  • 3 tbsp softened butter
  • 1 tbsp flour
  • 1/2 tsp vanilla extract
Directions:
  1. Slice and peel the pears.  They should be ripe all the way through, but still firm.
  2. In a small sauce pan, combine water, sugar, vanilla bean (seeds and pod), and orange zest.
  3. Simmer until the sugar is dissolved.
  4. Stir in the Lillet.
  5. Place the pears in a shallow bowl and pour the mixture over.
  6. Leave the bowl on the counter until it has cooled to room temperature, then cover and refrigerate for a minimum of two hours.  Longer is better (overnight would be great).
  7. Make the tart crust, according to the instructions in the link.
  8. For the frangipane, after the almonds are coarsely ground, add the remaining ingredients to the food processor and pulse until everything is blended.
  9. Press the tart dough into a 9" tart pan.
  10. Spoon the frangipane into the tart and spread until it's even.
  11. Fish the pear slices out of the sauce.  Strain the sauce and set aside.
  12. Press the pear slices gently into the frangipane.
  13. Bake the tart on a sheet pan in a 350 degree oven for about 30 minutes, until the crust and frangipane is slightly golden and firm in the center.
  14. Let the tart cool.
  15. While the tart is cooling, return the reserved sauce to the stove.  Reduce over low heat until the syrup thickens slightly, about ten minutes.  While still warm, brush the syrup over the top of the tart for a lovely sheen.
This tart is lovely for dessert, but absolutely perfect for tea.  The floral notes of the orange, vanilla, and Lillet will be wonderfully complemented by a cup of Earl Grey.  Enjoy!

Tuesday, March 1, 2011

Let's Talk Duck.

There are many types of ducks out there, all of which are cute, many of which are tasty.  But not all ducks are equal in the kitchen.  So let's get our ducks in a row.


This is the Mallard.  He is most often seen quacking around in ponds.  We don't usually eat him, unless we hunt him ourselves in the wild.  Most wild ducks descend from the Mallard.


This is a Pekin duck.  He is a very domesticated descendant of the Mallard.  He is most often seen on farms and hawking car insurance.  Pekin ducks are usually seen in Chinese cuisine.  They are also what you are likely to find frozen in most large, chain grocery stores for relatively inexpensive prices (though high quality Pekin can be quite pricey).  Though he looks plump and juicy, you won't get as much meat off of him as you think you will.  Pekin duck is ideal for very slow roasting: it has a lot of fat content throughout the meat that takes time to work its way out.  The meat is paler and it is the mildest tasting duck, which to me translates as the blandest.  It's often served with rich sauces.  Some people think it's more forgiving in the kitchen, but I find it easily become too greasy and I'd rather take a risk for a better outcome.


This handsome fellow is the exotic Muscovy duck, hailing originally from the Americas.  Doesn't he look like a bit like our other big bird, the turkey?  He is much more distantly related to the Mallard than other ducks we see.  Muscovy ducks are considered the gamiest tasting of all ducks; their meat is dark, lean, and often compared to beef.  It is the hardest duck to find for eating and you will pay the price.  I have yet to eat a Muscovy for this very reason.


This is the Moulard duck.  The mule of the duck world, he is a cross between a female Pekin duck and a male Muscovy.  This is a man-made creation (their, uh, interesting anatomy necessitates this) and the Moulard is infertile.  This is the duck that is used in most restaurants of the French persuasion.  It is my favorite eating duck.  The meat is relatively dark and lean, but it has a lovely, rich fat layer along the outside.  It is gamey, but not overwhelmingly so.

Often on restaurant menus, you will see "Duck Magret".  This very specifically refers to the breast meat of Moulard ducks that were used to produce foie gras (as most Moulard ducks are).  As ducks are more docile and take up less room than geese, they are now more commonly used for foie gras production.  This fattens the ducks up quite a bit, producing large, meaty animals.  So, yes, that means that if you've ordered duck in a restaurant, you've likely eaten a result of the foie gras practice, even if you turned away from the pate in objection.

Duck magret is usually found in butchers and specialty shops.  It is worth seeking out.  If a recipe calls for duck magret, you can't simply substitute Pekin to achieve the same results.  The dish might work enough, but it won't be as good.  Expect to pay $10-13 per pound for duck magret.  A one pound breast easily feeds two people.

Now on to the cooking!


As promised I will re-visit the Martha Stewart recipe I used for Valentine's Day, found here.  But first, let's go over some duck basics.
  1. Score the fat.  You want to use a sharp knife to cut about halfway through the fat in a diamond pattern.  This will help render the fat out of the breast and create a delicious, crisp exterior.  Be careful not to cut all the way down to the flesh.
  2. Render the fat.  In my experience, duck magret does best when started on the stove top.  That direct heat renders the fat most efficiently and successfully.  Now, you aren't trying to melt all of the fat away.  Rather, your goal is to reduce the fat, fully cook what remains, and create a crisp skin.
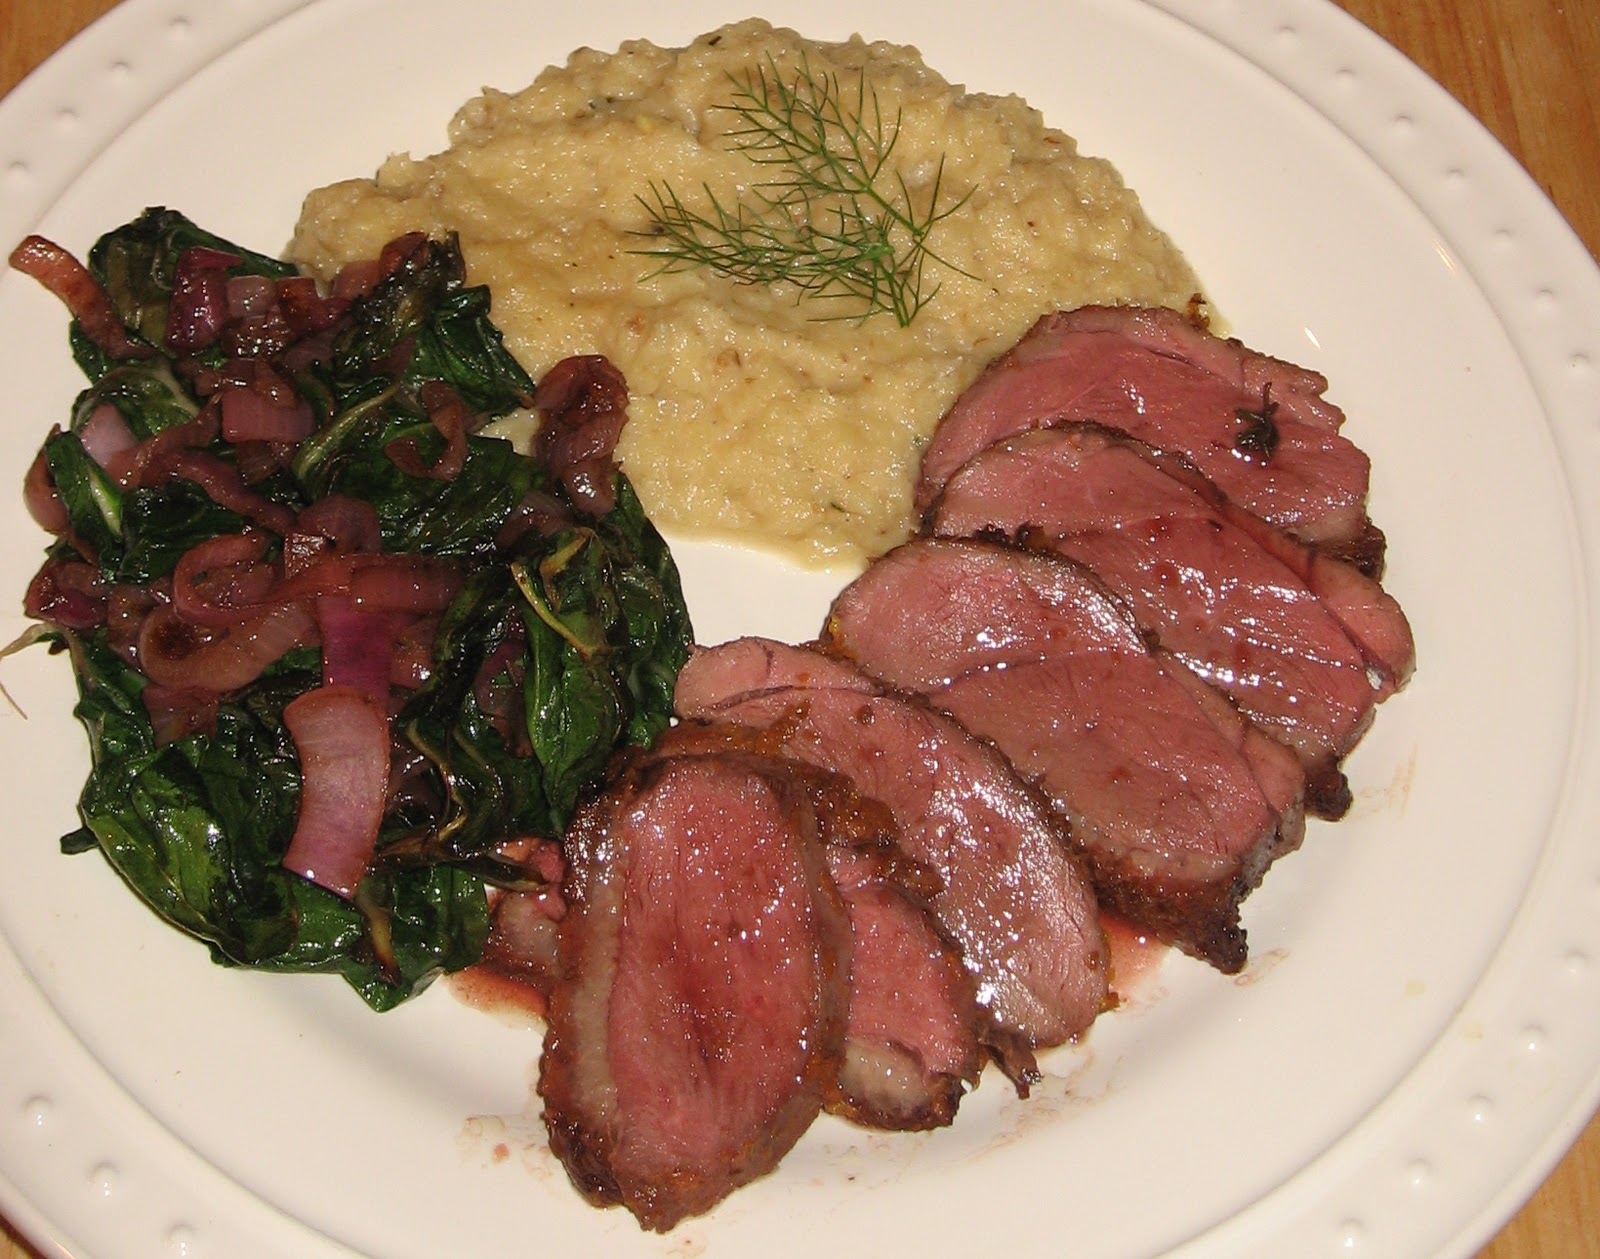
  3. Don't you dare overcook that duck.  Duck is not chicken!  Many people freak out and think that because you completely cook chicken and duck is poulty any little tinge of pink in duck is going to kill them.  No!  Don't think that!  Duck should not be cooked above medium (it's considered red meat, so treat it as such).  Some people like it quite rare.  I myself prefer it to hover right around medium-rare.  Look at the photo above (it does have some pomegranate sauce over it that gives it a slightly pinker tinge, but not much).  The meat is a solid rich pink.  It is evenly cooked all the way through, just enough to eliminate that sort of translucent rawness that would remain if it were a bit more rare.  Cooked like this, the duck will be tender and flavorful.
On to Martha's recipe:
  • She says to marinate the duck at least a half hour.   I marinated mine a full day.  While duck magret is delicious in its own, marinading it for 24 hours made it so outstanding.  The flavors permeated every bite without overwhelming.  It was floral in the best way and complemented the meat so perfectly.  This will be my go to duck recipe from now on.
  • Martha used ground fennel.  I had fennel seeds, so I chopped them and used that and it worked well.
  • I didn't have coriander, so I left that out.  I think I put just a tiny sprinkle of dried thyme because I felt guilty.
  • It's not listed in the ingredients, but the directions call for dried lavender.  It sounds weird, but it was so good.  Find dried lavender!  If you absolutely can't find it, use some herbes de provence, which usually has some, (and make a note to buy a bag of lavender at the farmers' market this year).  I think I used a rounded half teaspoon for just under two pounds of meat and I chopped it up a bit first.
  • I didn't mix the spices together first.  I put the spices on first, then covered them with salt.  I think this worked well to lock the flavor in?  Also, I know this seems like a lot of salt, but do it.
  • I zested the orange onto the meat, then just pressed who sprigs of thyme on top, then covered with plastic wrap.  The sprigs were removed before cooking.  The thyme flavor wasn't too noticeable, (though it was there).  While you could pick the leaves off the thyme and mix it with the zest, I quite liked the thyme taking a back seat here and I don't think I would have liked the texture of the leaves left on the meat.  I might try it next time, though.
  • I used a cast iron skillet to cook the duck.  It worked beautifully and my pan was so well seasoned after.  A heavy stainless steel pan would work fine, but I feel like cast iron exists for this recipe.
  • I cooked my duck on the stove top for a solid 15 minutes.  It could have gone a few more if you like a slightly thinner fat layer.  This fat is really tasty, though.  It absorbed the marinade flavors so well.
  • Woah, Martha!  Four minutes in the oven?  I left mine in for 8.  Many people would want to go 10 or 12.
  • Do let your duck rest before slicing.
  • SAVE THE FAT!  Seriously.  There will be a major pool of melted duck fat left in your pan.  Put it in a jar and put it in your fridge.  You might want to run it through a strainer to get any larger chunks of debris out, otherwise it will just sink to the bottom.  This fat is so flavorful, you will want to use it in everything.  Definitely try frying some potatoes and using it in a dressing for a warm frisee salad.
There.  Now you know just about everything I know about duck.  Promise to use this knowledge only for good.

Happy quacking!