Thursday, September 29, 2011

Roasted Red Pepper Sauce


As an easy alternative to tomato sauce, roasted red pepper sauce increases the elegance of any pasta dish.  I especially like it on ravioli where it can play off of the flavors of the filling: here I used it atop artichoke ravioli.  It would also be sublime on a pizza or in lasagna.

This sauce comes together in a snap and is easily adjusted to make any quantity.

Ingredients:
- Red bell pepper
- olive oil
- garlic
- salt
- oregano
- red pepper flakes (optional)

Directions:
- Rub the outside of the red pepper with olive oil and put it in a pan under the broiler.
- Cook the red pepper until the outside is charred, rotating as needed.
- When the pepper comes out of the oven, cover it with a bowl or towel.
- Once the pepper is cool enough to handle, the skin should easily rub away.
- Remove the top and pulp inside and put the rest of the pepper in a blender or food processor.
- Puree until smooth.
- In a small pan, combine a healthy drizzle of olive oil (about 1 tbsp per average sized pepper), some minced garlic, a sprinkle of salt, some dried or fresh oregano, and the red pepper flakes, (these provide a little heat as the roasted red bell pepper is actually quite sweet).
- Heat the oil over medium until fragrant, then stir in the red pepper puree.
- Reduce heat to low and simmer for 5 minutes to let the flavors combine.
- Adjust seasoning as needed.  A little pasta water can be added to thin the sauce if desired.

For a little extra decadence you could add a dash of cream and/or parmesan cheese to the sauce, though it is certainly delicious as is.

Enjoy!

Tuesday, September 27, 2011

Celebrate Celery with Sensational Seasonal Soup


Celery.  You know.  That green stuff that's usually left on the crudite platter, alone and limp.  That ingredient you usually skip in complicated recipes because you don't have it and who wants to buy a whole bunch of celery for a stalk or two and who's going to notice anyway?

Well, I have news for you: celery is actually really delicious.

But!  There are two rules for maximum celery deliciousness:
1. Buy quality celery that still has its leaves.
2. Cook it!

When you're making a dish that really features the celery, I recommend seeking it out at a farmers' market, (contrastingly, if you're looking for a vehicle for ants on a log then giant, watery, crispy supermarket celery is the way to go).  Farmers' market (organic) celery will usually look a little different: the stalks will likely be much thinner, it will probably be darker green, and it will have a full crown of lovely leaves.  This is a wonderful thing.  While I find the stalks themselves to be more flavorful, the leaves of the celery are actually the most flavorful part and should be used for cooking.  If you buy from a supermarket, they often cut the leaves off entirely or leave just a few.  Ask your produce manager to sell celery with leaves!

Okay, so you have quality celery.  It will be tasty on its own, but cooking celery really brings out the delicate flavors.  Regardless, these are not in your face flavors. A little grassy and floral with just a hint of onion, it is subtlety embodied.  But make the time and effort to appreciate this flavor and you will find it most pleasing.  This soup is very pleasing, indeed.

Ingredients:
- 4 tbsp unsalted butter
- 1 tsp salt
- freshly ground black pepper
- a pinch of paprika
- 1 1/2 c. diced yellow onion
- 3 c. diced celery stalks
- 2 c. roughly chopped celery leaves
- 3 c. water
- zest and juice of 1/4 lemon


Directions:
- Melt the butter in a large-ish pot and add the onions, celery, salt, a few grinds of pepper, and paprika.
- Cook over medium heat until the onions are transparent, about 15 minutes.  Stir as needed.
- Add the 2 c. celery leaves for the last five minutes.
- Add the the water, zest, and lemon juice.
- Cover and simmer over low heat for at least 30 minutes, (I let it go for an hour).
- Carefully pour the soup into a blender and blend on high until the soup is smooth.
- Taste and adjust for seasoning.  I added just a little smoked sea salt.
- Serve plain or with a dollop of greek yogurt and paprika or celery salt for garnish.

If you have leftover celery leaves, dry them for future use!  Lay them out on a baking sheet and put in a 250 degree oven for about 5 minutes, until they are dry enough to crumble.  You can make celery salt, a lovely garnish, or keep them plain to add a little celery flavor to future dishes.

If you absolutely can't find celery with (enough) leaves, you can still try the recipe but I would add some celery seed, increase the amount of celery stalks, and try to reduce the soup a bit to intensify the flavor.

Enjoy!

Sunday, September 25, 2011

Habanero Peach Hot Sauce


I grew some habanero peppers this year, an impulsive nursery purchase for which I had no plan.  So they grew and grew and I began to accumulate them as I harvested, not knowing what to do.  After one mouth-burning salsa that determined that I wouldn't be eating them raw, I decided to try my hand at cooking hot sauce.  It turned out quite well: insanely spicy, but not without flavor.  Now I just have to figure out what I'll use the hot sauce for...

Ingredients:
- 6 habanero peppers (I used them when they were orange-- hotter-- but you could use green ones, too)
- 1 peach
- 3 tbsp apple cider vinegar
- 1 tsp salt
- 1/4 c. water
- 1 tbsp olive oil

- Skin and dice the peach, chop up the pepper (wearing gloves!!!), and combine in a food processor, blending until smooth.
- Combine the puree with all other ingredients in a small sauce pan.
- Bring the mixture to a gentle boil, then reduce the heat to low and simmer, covered, for 30 minutes.
- Allow to cool and then refrigerate.

That's all!  Enjoy!

Friday, September 23, 2011

Beet & Goat Cheese Tart


This one is worth staining your fingers pink!

Beets and goat cheese are a classic combination: go to any semi-chic luncheon spot and you will see a beet and goat cheese salad on the menu.  Earthy and sweet, creamy and tart: they're a perfect pair.  Throw a little balsamic vinegar in there, maybe some walnuts, and you've got yourself one delicious and satisfying lunch.

But what if you're not in the mood for a messy, banal chopped up salad?  What if you want something a tad more refined, a little prettier, a little... fancy?  Well, if that's you-- and even if it's not-- I have a tart that might just knock your socks off.

This tart is very simple: a whole wheat crust, a goat cheese filling, roasted beets, and a balsamic glaze.  A little thyme throughout emphasizes the earthiness and helps bring it into fall.

Crust:
- 6 tbsp unsalted butter
- 1 tbsp olive oil
- 3 tbsp water
- 1/4 tsp salt
- 1/2 tsp dried thyme or Italian herb blend
- 1/2 c. all purpose flour
- 1/2 c. whole wheat flour

- Cut up the butter and combine in a large glass bowl with the olive oil, water, salt, and herbs.
- Put the bowl in an oven preheated to 400 degrees and bake for 15 minutes.
- Carefully take the bowl out and add the flours all at once, stirring with a wooden spoon until combined.
- Let the dough cool until it is safe to handle.
- Place the dough in your tart pan and push it out with your fingers, making sure to press it firmly into the sides.
- Bake the tart shell at 400 degrees for 10-15 minutes, until it is just firm but still pale.  Set aside to cool.


Filling:
- 1/4 c. minced onion or shallot
- 1/4 tsp salt
- 1/2 tsp fresh thyme leaves
- dash of freshly ground black pepper
- 2 eggs
- 5 oz. fresh goat cheese, softened
- 2-ish roasted beets

- Add the onion to a food processor, (a mini/prep version will do), and pulse a few times until it is finely minced.
- Add the remaining ingredients, except the beets, and blend until the mixture is even.
- Pour the goat cheese blend into your cooled tart shell.
- Peel and slice your beets into 1/4" slices.  You could certainly slice your beets thinner for a more elegant look, but be sure not to fan them out too much or they may dry out during baking.
- Delicately arrange the beet slices on top of the goat cheese mixture, taking care to 'float' them rather than push them in.  I recommend laying your slices out on a plate first so you know just how you want them: once you put them on the goat cheese you won't want to move them.
- Bake the tart at 400 degrees for about 30 minutes, until the goat cheese is set.

Glaze:
- 3 tbsp balsamic vinegar
- 1 tbsp honey
- dash of pepper
- 1/4 tsp. fresh thyme leaves

- Combine all ingredients in a small sauce pan and simmer until it is reduced by half, the honey bubbles, and the mixture becomes syrupy.
- Brush over the top of the tart as soon as it comes out of the oven, (you won't use it all).
- Allow the tart to cool before serving.


With the multiple steps, this tart can be a little time consuming but there's nothing actually difficult about it.  Even better, the crust can be made and par-baked and the beets can be roasted days ahead of time, leaving only a little whirring of the food processor and some arranging to do before tossing it in the oven.

Serve this savory tart with a simple green salad, a delicate vegetable soup, or some lightly sauteed greens.  Refrigerate it if it won't be consumed the day it's made.

And guess what?  If you swap the herbs in the crust for a bit of sugar, leave the onions out of the filling, and put a bit more honey in the glaze... you have dessert!

Enjoy!

Thursday, September 22, 2011

Quick tip: Freezing Tomatoes


This year I didn't have quite enough spare tomatoes to bother with canning them, so I froze some instead. While you can freeze them whole, (a great way to get the skins off), I chopped mine up so I could freeze them flat for easy storage.  To make things even easier, try dividing the tomatoes within the bag: after filling the bag and laying it flat in a pan, gently separate the chopped tomatoes into more manageable portions.  Freeze it in the pan until solid, (to keep them flat).  These 1/2 c. squares are easily broken apart so I can take out what I need without defrosted the entire bag, reducing possible waste.  Now they are ready to add to soups, sauces, and casseroles!

Wednesday, September 21, 2011

Simple Corn Soup


Do you buy your corn from the farmers' market?  If not, you should.  The difference in flavor and texture is amazing when the corn is picked fresh rather than shipped for days and lingering in a pile at the supermarket.

I get my corn from Stillman's Farms.  Since they pick it *the very same morning* as the farmers market, it is amazingly tender, juicy, and sweet, despite the fact that they don't grow the super-sweet varieties usually seen at the grocery store.

When it's this good, I often eat it raw straight off the cob.  Or I put it in everyone's favorite corn and black bean salad.  But, with summer at its end, I realized I had yet to make corn soup!  Not only had I promised myself I would this summer, but it's also a great way to preserve that corny freshness well into winter.

Okay, ready for the recipe?

- 8 ears of corn (about five cups of kernels cut from the cobs)
- 5 c. water
- 1 1/2 tsp salt
- a dash of black pepper

- Put everything in a big pot, (even the shorn cobs!), and simmer for at least 30 minutes.
- Carefully pour it into a blender and... blend it... until soupy.

Voila!  Seriously, this is a no-fuss dish.


However!  This is really only the beginning.  While you can certainly enjoy it like this, I like to enhance the flavor a bit.  In the photo at the top, I simmered the corn with a few tablespoons of minced chives and stirred in just a touch of butter at the end.  I topped it with a drizzle of basil pesto to serve.

In another batch that I made for freezing, I roasted a red pepper and added that to the blender, (be careful not to add to much or it can overpower the corn).  I froze individual portions that I will be able to easily thaw and even add to the flavor a bit more.  I'm thinking some roughly chopped cilantro and a dollop of greek yogurt one night.  Maybe some sauteed leeks or onions and another trip to the blender another night?

If you want to make a particularly elegant soup, you may want to strain it.  I didn't.  After I made it the first time I gave it a try and wasn't bothered at all by the little bits of 'corn kernel skin', as they were very tender , (another bonus of local corn: it hasn't been bred to be tough to hold up during travel), and finely blended.  But there are certainly times when you might not want that, so strain away!

Enjoy!

Tuesday, September 6, 2011

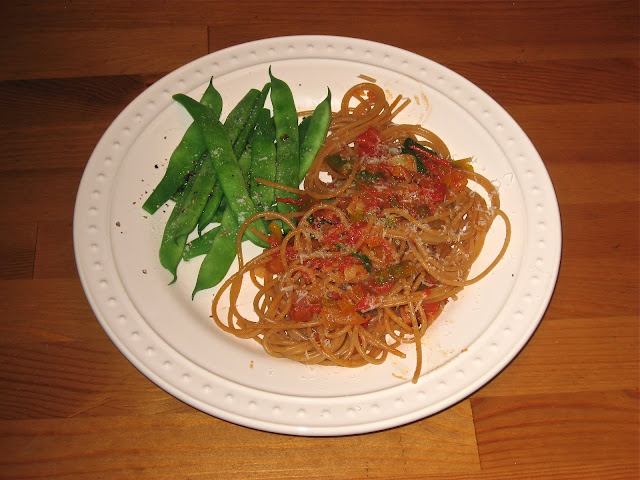
Fresh and Simple Pasta Sauce


While there are many people who slave away in the kitchen for hours over a hot stove to perfect their Italian grandmother's tomato sauce, and while it may very well be quite delicious, I prefer a more casual approach to my summertime pasta.  This one comes together in about 20 minutes, (depending on your speediness with a knife).  It's a light, chunky sauce that lets you know exactly which vegetables you're eating.

Ingredients (for two servings):
- 3 tbsp olive oil
- 2 cloves garlic, minced
- 1/4 tsp. red pepper flakes
- 1/2 tsp salt
- 2 sprigs fresh oregano (or 1/4 tsp. dried)
- 3/4 c. onion, minced
- 3/4 c. yellow bell pepper, diced
- 1 1/2 c. tomato, diced
- 1/4 tsp. brown sugar
- handful of basil leaves, roughly chopped.


Directions:
- Add the olive oil to a large skillet and heat over medium high.
- Add the garlic, red pepper flakes, salt, and oregano and saute for about a minute.
- Add the onion and saute until just translucent, about 3 minutes.
- Add the bell pepper, tomato, and brown sugar.
- Continue to cook, stirring occasionally and lightly mashing the tomatoes with a wooden spoon for about 8 minutes until all of the vegetables are tender.
- If you would like a slightly thicker sauce, add about 1 tbsp tomato paste.
- Taste for seasoning, adjusting salt and brown sugar, (sparingly), as needed.
- Just before serving, add the fresh basil and toss another minute.
- Add your pasta to the pan and toss to coat.

I used whole wheat spaghetti as I really like the slightly nutty taste with the freshness of the vegetables. Optionally top you pasta with some good parmesan cheese for serving.  As a side I prepared some fresh romano green beans by boiling them in the pasta water for about 2-3 minutes, then tossing them with good quality extra virgin olive oil, salt, and black pepper.

Enjoy!

Sunday, September 4, 2011

Let's Get Pickled!


I have had quite the bounty of cucumbers this year.  Perhaps I was a little overzealous in my planting after last year's early August cucumber death, but at least I've had plenty to work with for experimenting.  Refrigerator pickles are quick, easy, and pretty hard to mess up.  You can play around with the ingredients and proportions and the worst that will happen is an underwhelming pickle.  I've had more success than failure and have enjoyed every bite either way.  Here, from left to right, are Spicy Mustard, Cornichons, Dill, Habanero, and Basil pickles.


I grew an heirloom variety of cucumbers called Parisian Pickling.  These are great as they can be picked at any size, most notably when they are quite small to be made into Cornichons, those delicious little cocktail pickles.  However, I found that these cucumbers were also sublime when left to grow to full size.  They were crisp, light, mildly sweet, with tender skin and seeds.  And obviously plentiful.  Their only drawback was the burps.  I seemed to have two variations of burps, (perhaps some seed contamination?): fewer, larger burps that were easily pushed off with a thumb or cucumbers that were absolutely covered in tiny little spines that needed rubbing off with a cloth, (those in the upper right in the photo).  Either way, they were worth the additional effort and I plan on growing them again next year.


On to the recipes!  All of these recipes can be made with any shape of pickles.  The main variable is how long it will take the flavor to saturate the cucumber: round slices are the fastest, followed by spears, and whole pickles will take significantly longer.  Simmering the liquid (and dissolving any salt) will make the cucumbers pickle faster but putting everything in cold will result in slightly crisper, greener pickles.  All recipes can be increased or decreased for the desired size of jar.  Make sure the liquid covers the cucumbers: if you're a little short, go ahead and add a little water to the jar.

Spicy Mustard Pickles (for 1 pint):
- 3 tbsp whole grain mustard
- 2 tsp kosher or sea salt
- 2 tsp red pepper flakes
- 1/4 tsp fennel seed, crushed
- 1 c. water
- 1/2 c. white vinegar
- 1 tbsp apple cider vinegar

- Add all ingredients to a small sauce pan and simmer just until the salt is dissolved.
- Pack your jar with clean pickled (I used sliced).
- Pour the hot mixture into the jar.
- Replace the lid and allow to come to room temperature.
- Refrigerate for 3-10 days.


Dill Pickles (for 1 quart):
- 1 tbsp apple cider vinegar
- 1 tbsp salt
- 1/2 tsp fennel seeds, crushed
- 1/2 tsp red pepper flakes
- 1 tsp black pepper corns
- 1 tsp dill seed (optional)
- 2 garlic cloves, sliced
- 1 1/2 c. water
- 1 1/2 c. white vinegar
- a whole bunch of fresh dill

- Combine all ingredients except for the fresh dill into a small sauce pan and simmer until the salt is dissolved.
- Pack the bottom of the jar with a large handful of fresh dill.
- Pack the cucumbers (I used spears) into the jar.
- Top the cucumbers with even more(!) fresh dill.  You can't have enough dill.
- Pour the hot mixture (or allow it to cool to luke warm) into the jar.
- Cover the jar and allow it to come to room temperature before refrigerating for 3-10 days.


Basil Pickles (for 1 pint):
- about 1 dozen large basil leaves
- 1 clove garlic, sliced
- 1 tbsp kosher or sea salt
- 1/2 tsp freshly ground black pepper
- 1/2 tsp red pepper flakes
- 1 tbsp apple cider vinegar
- water

- Put all ingredients except the water into the bottom of the jar.
- Add cucumbers (sliced highly recommended).
- Fill the rest of the jar with cold water.
- Put the lid on and shake the jar.
- Refrigerated for 5 days.  While they will last longer, I found the flavor of these to be at their peak between 5 and 25 days.


Cornichons (for 1 pint):
- 1 tsp fennel seed, crushed
- 1 tsp black peppercorns
- 1/2 tsp red pepper flakes
- 1 clove garlic, sliced
- 2 tsp kosher or sea salt
- 1/2 c. white vinegar
- 1 c. water

- Add all ingredients to a small sauce pan and simmer just until the salt is dissolved.
- Pack your jar with small cucumbers.
- Pour the hot mixture into the jar.
- Replace the lid and allow to come to room temperature.
- Refrigerate for 7 days.


Habanero Pickles (for 1 quart):
- 1 habanero (don't even think about putting in another)
- 1 tbsp salt
- 1 tsp ground black pepper
- 1 clove garlic, sliced
- 2 tbsp apple cider vinegar
- 1 c. white vinegar
- 2 c. water

- Pack your jar with cucumbers, (I recommend sliced as they are quite spicy).
- Combine all ingredients and pour them on top of the cucumbers.
- Replace the lid and refrigerate for 3 days.


All pickles should last in the refrigerator for at least 2 months, though I doubt you'll be able to keep them around that long.  Feel free to play with different herbs and spices and adjust the saltiness to your own preference.  Pickling cucumbers can be found at most farmers markets and regular cucumbers can also be used.

Enjoy!


P.S.  It's my 100th post!  Yay!